
Quick Start
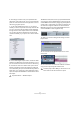


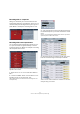
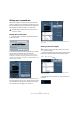


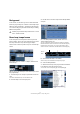
Table Of Contents
- English
- Table of Contents
- Introduction
- System requirements and installation
- Setting up your system
- Tutorial 1: Recording audio
- Tutorial 2: Editing audio
- Tutorial 3: Recording and editing MIDI
- Tutorial 4: Working with loops
- Tutorial 5: External MIDI instruments (Cubase only)
- Tutorial 6: Mixing and effects
- Tutorial 7: Surround production (Cubase only)
- Tutorial 8: Editing audio II - tempo and groove
- Tutorial 9: Media management
- Index
- Español
- Tabla de Contenidos
- Introducción
- Requisitos del sistema e instalación
- Configuración del sistema
- Tutorial 1: Grabación de audio
- Tutorial 2: Editar audio
- Tutorial 3: Grabar y editar MIDI
- Tutorial 4: Trabajar con loops
- Tutorial 5: Instrumentos MIDI externos (sólo Cubase)
- Tutorial 6: Mezclar y efectos
- Tutorial 7: Producción surround (sólo Cubase)
- Tutorial 8: Editar audio II - tempo y groove
- Tutorial 9: Gestión de medios
- Índice alfabético

62
Tutorial 6: Mixing and effects
6. Normally you’ll want to save your exported file as a
“Wave File” under “File Format”. This of course chiefly de-
pends on what file format the other application such as a
CD burning program requires.
7. In the Channel Selection section, you can choose
whether you want to export the main output channel “Ste-
reo Out”. This means the exported file will be generated
through the main stereo outputs that we see in the Mixer.
You can also choose the individual outs of each audio
channel for flexibility in your export. Let’s choose “Stereo
Out”.
8. In the Audio Engine Output section, choose the “Sam-
ple Rate” and “Bit Depth” that will be required for your ex-
port. 44.100 kHz and 16 bit are common for CD burning.
9. Activate the “Pool” and “Audio Track” options at the
bottom of the dialog, as these will import the audio back
into Cubase after you export it and automatically create an
audio track. If you activate the “Close dialog after export”
option, the “Export Audio Mixdown” window will also close
after export.
10. Before we finish, there is one very important feature that
we must select. This is “Realtime Export”. Since we have an
external MIDI instrument that is playing a physical keyboard
and its audio is coming back into Cubase, we need the au-
dio mixdown to happen in realtime. This ensures that the
MIDI data is properly sent to the external MIDI instrument
and recorded back in. Don’t forget this step!
11. When you are done making all the settings, click the
Export button.
12. You will now see the exported stereo mix on a new
stereo track.
13. You can check to see if the audio mixdown sounds the
way you want it by soloing the mixdown track
!
Important Feature – “Realtime Export”!
!
Load the project called “Mixing 9” found in the “Tuto-
rial 6” folder to see the results of this export.