
Quick Start
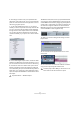


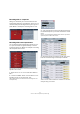
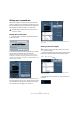


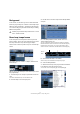
Table Of Contents
- English
- Table of Contents
- Introduction
- System requirements and installation
- Setting up your system
- Tutorial 1: Recording audio
- Tutorial 2: Editing audio
- Tutorial 3: Recording and editing MIDI
- Tutorial 4: Working with loops
- Tutorial 5: External MIDI instruments (Cubase only)
- Tutorial 6: Mixing and effects
- Tutorial 7: Surround production (Cubase only)
- Tutorial 8: Editing audio II - tempo and groove
- Tutorial 9: Media management
- Index
- Español
- Tabla de Contenidos
- Introducción
- Requisitos del sistema e instalación
- Configuración del sistema
- Tutorial 1: Grabación de audio
- Tutorial 2: Editar audio
- Tutorial 3: Grabar y editar MIDI
- Tutorial 4: Trabajar con loops
- Tutorial 5: Instrumentos MIDI externos (sólo Cubase)
- Tutorial 6: Mezclar y efectos
- Tutorial 7: Producción surround (sólo Cubase)
- Tutorial 8: Editar audio II - tempo y groove
- Tutorial 9: Gestión de medios
- Índice alfabético

61
Tutorial 6: Mixing and effects
6. You can also use the “Line” tool to draw in automation
in a straight line. Perfect for fade in automation.
7. Listen to the fade in automation we created.
• You may have noticed that when we used the Pencil
tool to place in automation, the “R” button (Read Enable)
for the track became highlighted. This means that the au-
tomation on this track is being read or played back. You
can turn this off and the automation will not be read. In our
case we drew in volume automation, and so in turning it off
the volume will not fade in but stay at one level.
There are so many examples to show when it comes to au-
tomation. For example we could have automated our effects
or our send levels. We could have even automated objects
while Cubase was playing back. The automation can be
placed into write mode and moving almost any thing will
create automation that we can edit for fine tuning later!
Make sure you read the chapter “Automation” in the Opera-
tion Manual to fully realize how exciting automation can be.
Exporting
Now that we have our project mixed we will want to export
it so that we can import it into another program such as a
CD burning application.
• Before we can export our mix we need to tell Cubase
how many bars to export. We accomplish this by setting
the locators.
1. Set the left locator to bar 1 and the right locator to bar
65 on the Transport panel. This will make sure we have all
the music for export.
2. Open the File menu, and on the Export submenu se-
lect “Audio Mixdown…”.
3. The “Export Audio Mixdown” dialog opens.
This dialog is described in detail in the chapter “Export Audio Mixdown” in
the Operation Manual.
4. “File Name” is for naming the file for export. Let’s name
our’s “Mixing Mixdown”.
5. The “Path” is where you wish to save the exported file
on your computer. Open the “Path Options” pop-up menu
to the right of the Path field and select “Choose…” to nav-
igate to the folder you wish to save to. For convenience
there is the option “Use Project Audio Folder” which will
store the exported file in your project’s audio folder. This is
one of the best places to keep it so it won’t accidentally
become erased or lost. Make sure “Use Project Audio
Folder” is activated for this export.
!
Load the project “Mixing 8” found in the “Tutorial 6”
folder.
Left Locator Right Locator