
Quick Start


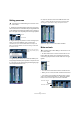
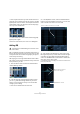
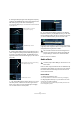


Table Of Contents
- English
- Table of Contents
- Introduction
- System requirements and installation
- Setting up your system
- Tutorial 1: Recording audio
- Tutorial 2: Editing audio
- Tutorial 3: Recording and editing MIDI
- Tutorial 4: Working with loops
- Tutorial 5: External MIDI instruments (Cubase only)
- Tutorial 6: Mixing and effects
- Tutorial 7: Surround production (Cubase only)
- Tutorial 8: Editing audio II - tempo and groove
- Tutorial 9: Media management
- Index
- Español
- Tabla de Contenidos
- Introducción
- Requisitos del sistema e instalación
- Configuración del sistema
- Tutorial 1: Grabación de audio
- Tutorial 2: Editar audio
- Tutorial 3: Grabar y editar MIDI
- Tutorial 4: Trabajar con loops
- Tutorial 5: Instrumentos MIDI externos (sólo Cubase)
- Tutorial 6: Mezclar y efectos
- Tutorial 7: Producción surround (sólo Cubase)
- Tutorial 8: Editar audio II - tempo y groove
- Tutorial 9: Gestión de medios
- Índice alfabético

60
Tutorial 6: Mixing and effects
6. Click the “Activate Send 1” button to turn on the send.
This will allow you to send the guitar to the “StereoDelay”.
7. Move the slider to the right to raise the level of the
send to the “StereoDelay” effect. You will begin to hear
the guitar being delayed. Clicking the “S” (solo) button on
the track will allow you to hear this more clearly.
8. The great thing about FX Channels is that the channel
looks and feels just like a regular audio channel. When you
set an EQ for an FX Channel, only this effect will be
changed by the EQ. In our case changing the EQ on the
“FX 1 – StereoDelay” FX channel will only change the EQ
of the delay.
About automation
Automation allows us to make objects such as faders and
knobs move by themselves. This is very handy in that we
can tell Cubase to make changes over a period of time
and those changes will be remembered and will occur
again without our attention.
1. We created a fade-in on the “Elec Guitar” track earlier.
Let’s remove the fade on this audio event and create some
automation instead. Zoom in so that you can see the first
audio event more clearly.
2. Select the event and choose “Remove Fades” from
the Audio menu.
3. Click the “Show/Hide Automation” button at the far
left of the track.
You may need to hover your mouse over the far left bottom area until you
see the button appear as this is only shown when you need it.
4. Select the Pencil tool.
5. In the subtrack that appears below the audio event
use the Pencil tool to draw in automation so that it resem-
bles a fade in.
!
Load the project called “Mixing 7” found in the “Tuto-
rial 6” folder.