
Quick Start
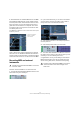


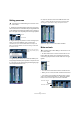
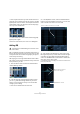


Table Of Contents
- English
- Table of Contents
- Introduction
- System requirements and installation
- Setting up your system
- Tutorial 1: Recording audio
- Tutorial 2: Editing audio
- Tutorial 3: Recording and editing MIDI
- Tutorial 4: Working with loops
- Tutorial 5: External MIDI instruments (Cubase only)
- Tutorial 6: Mixing and effects
- Tutorial 7: Surround production (Cubase only)
- Tutorial 8: Editing audio II - tempo and groove
- Tutorial 9: Media management
- Index
- Español
- Tabla de Contenidos
- Introducción
- Requisitos del sistema e instalación
- Configuración del sistema
- Tutorial 1: Grabación de audio
- Tutorial 2: Editar audio
- Tutorial 3: Grabar y editar MIDI
- Tutorial 4: Trabajar con loops
- Tutorial 5: Instrumentos MIDI externos (sólo Cubase)
- Tutorial 6: Mezclar y efectos
- Tutorial 7: Producción surround (sólo Cubase)
- Tutorial 8: Editar audio II - tempo y groove
- Tutorial 9: Gestión de medios
- Índice alfabético

57
Tutorial 6: Mixing and effects
• There may be times when you want certain tracks to al-
ways play even if another track has solo active. If you [Alt]/
[Option]-click on the “S” button, this will place the track in
“Solo Defeat” mode. This allows the track to always play
even if you solo another track.
• To take a track out of “Solo Defeat” mode simply [Alt]/
[Option]-click it again.
That’s it for mute and solo, let’s move on to adding EQ.
Adding EQ
EQ or equalization amplifies or attenuates frequencies so
that we can place each instrument correctly in the mix. EQ
is subjective and can be influenced greatly by the style of
music that you are mixing.
We’re going to run through the EQ features that Cubase
has to offer, but feel free to experiment and try out the dif-
ferent presets on your mix.
1. Solo the Drums track and click the “Edit Instrument
Channel Settings” button.
2. This will open the Channel settings window, where
you can e.g. make EQ settings. Make sure you have a
section of music looping so that you can hear the EQ
changes you are making.
• There are four bands of EQ on each track.
3. In the Equalizers section, click the “EQ Band Active”
button for each of the EQs to turn them on. You can also
click in the EQ curve area to turn on an EQ.
4. Click and move the EQ point up, down, right or left.
Moving the EQ point up or down raises or lowers the gain
of the EQ. The gain makes that particular EQ louder or
softer. The “EQ Band Gain” at the bottom of the EQ win-
dow gives you the value of gain.
If you hold down [Ctrl]/[Command], you can restrict the movement of the
EQ to just up and down.
!
Load the project called “Mixing 4” found in the “Tuto-
rial 6” folder.
Click the “EQ Band Active” button to turn on an EQ.
Click in the EQ curve area to turn on an EQ.
Move the EQ up or down to
raise or lower the gain.
“EQ Band Gain” amount