
Quick Start
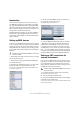
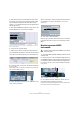
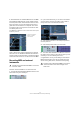

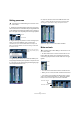
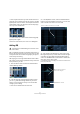
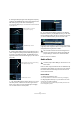


Table Of Contents
- English
- Table of Contents
- Introduction
- System requirements and installation
- Setting up your system
- Tutorial 1: Recording audio
- Tutorial 2: Editing audio
- Tutorial 3: Recording and editing MIDI
- Tutorial 4: Working with loops
- Tutorial 5: External MIDI instruments (Cubase only)
- Tutorial 6: Mixing and effects
- Tutorial 7: Surround production (Cubase only)
- Tutorial 8: Editing audio II - tempo and groove
- Tutorial 9: Media management
- Index
- Español
- Tabla de Contenidos
- Introducción
- Requisitos del sistema e instalación
- Configuración del sistema
- Tutorial 1: Grabación de audio
- Tutorial 2: Editar audio
- Tutorial 3: Grabar y editar MIDI
- Tutorial 4: Trabajar con loops
- Tutorial 5: Instrumentos MIDI externos (sólo Cubase)
- Tutorial 6: Mezclar y efectos
- Tutorial 7: Producción surround (sólo Cubase)
- Tutorial 8: Editar audio II - tempo y groove
- Tutorial 9: Gestión de medios
- Índice alfabético

56
Tutorial 6: Mixing and effects
Setting panorama
1. Setting the panorama (pan) for each track moves its po-
sition in the stereo mix. It will either keep the signal balanced
in the middle of the left and right speaker, lean to the left or
lean to the right or be completely in the left or right speaker.
2. Right-clicking in the panner for certain track types pre-
sents you with three different types of pan options.
The different pan options are described in detail in the chapter “The
Mixer” in the Operation Manual. Let’s leave the setting on “Stereo Bal-
ance Panner” for now.
• To get the panner back to the center (the default posi-
tion), [Ctrl]/[Command]-click anywhere in the panner area.
3. Let’s pan our two guitars slightly left and slightly right.
This will spread them out a bit.
4. Keep the “Drums” track in the middle but let’s move
“Loop 1” a bit to the left and “Loop 2” a bit to the right.
This will give our rhythm section a larger, more spacious sound.
That’s it for pan, let’s move on to Mute and Solo.
Mute and solo
• For each track there is an “M” for mute and “S” for solo
button. Mute will prevent you from hearing the track and
solo will only play that track or tracks which have “S” high-
lighted.
• You can have several tracks muted or soloed at a time.
• When you solo a track, the other tracks become muted.
• If you want to clear or deactivate all the mutes or solos,
click on the “Deactivate all Mute” or “Deactivate all Solo”
buttons in the common panel to the left of the Mixer.
!
Load the project called “Mixing 2” found in the “Tuto-
rial 6” folder.
Panner
Pan amount
Right-click the pan area to
open the pan mode pop-up
menu.
!
Load the project called “Mixing 3” found in the “Tuto-
rial 6” folder.
Solo
Mute
Deactivate all Mute
Deactivate all Solo