
Quick Start
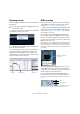

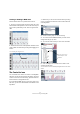

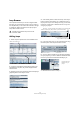

Table Of Contents
- English
- Table of Contents
- Introduction
- System requirements and installation
- Setting up your system
- Tutorial 1: Recording audio
- Tutorial 2: Editing audio
- Tutorial 3: Recording and editing MIDI
- Tutorial 4: Working with loops
- Tutorial 5: External MIDI instruments (Cubase only)
- Tutorial 6: Mixing and effects
- Tutorial 7: Surround production (Cubase only)
- Tutorial 8: Editing audio II - tempo and groove
- Tutorial 9: Media management
- Index
- Español
- Tabla de Contenidos
- Introducción
- Requisitos del sistema e instalación
- Configuración del sistema
- Tutorial 1: Grabación de audio
- Tutorial 2: Editar audio
- Tutorial 3: Grabar y editar MIDI
- Tutorial 4: Trabajar con loops
- Tutorial 5: Instrumentos MIDI externos (sólo Cubase)
- Tutorial 6: Mezclar y efectos
- Tutorial 7: Producción surround (sólo Cubase)
- Tutorial 8: Editar audio II - tempo y groove
- Tutorial 9: Gestión de medios
- Índice alfabético

43
Tutorial 3: Recording and editing MIDI
6. Set the left locator to bar “1” and the right locator to
bar “57”.
7. Make sure Cycle is turned off.
We are going to record without looping. We’ll cover MIDI cycle recording
in the section “Cycle recording” on page 44.
8. Press [1] on the numeric keypad of your computer
keyboard.
This will move the cursor to the left locator.
9. Click the Record button and record a few bars of
music.
10. Click the Stop button when you are finished.
11. Turn off the Monitor and Record Enable buttons on the
track so that we don’t hear the input or record on the track
any more.
Congratulations! You have just created your first MIDI re-
cording in Cubase. Move ahead to the next section to
learn how to play back MIDI.
MIDI playback
We are now going to learn how to play back MIDI in Cu-
base. You might think this is very simple – just hit “Play”. It
is actually this simple, but there are a few tricks to learn so
that you’ll be playing back what you want with precision.
To start playback
• Click the Play button on the Transport panel.
• Press [Space] on your computer keyboard.
This toggles between start and stop.
• Press the [Enter] key of the numerical computer keypad.
• Double-click in the lower half of the ruler.
• Select the MIDI event and choose “Loop Selection”
from the Transport menu.
To stop playback
• Click the Stop button on the Transport panel.
• Clicking the Stop button twice moves the cursor to the
position in the project, where you started playback.
• Press [Space] on your computer keyboard.
This toggles between stop and start.
• Press the “0” key of the numerical computer keypad.
Cycle playback
Cubase has the ability to loop or cycle a section of your
project. To set the cycle location you need to use the left
and right locator.
1. On the Transport panel, set the left locator to “1” and
the right locator to “5”.
This tells Cubase that we want to loop or cycle between bars 1 and 5.
Meaning we will have a 4 bar loop since the end of bar 4 is the beginning
of bar 5.
2. Make sure that the Cycle button is activated.
3. Click the Play button on the Transport panel and Cu-
base will play looping over and over until you click Stop.
!
For this section, make sure you load the project
“MIDI Playback” found in the “Tutorial 3” folder.
!
The default key command for this is [Shift]-[G]. This
is the quickest way to loop the selected MIDI event
and start playback!
The left locator set to “1”.
The right locator set to “5”.
Cycle
activated