
Quick Start
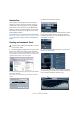
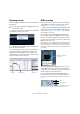
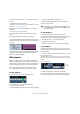

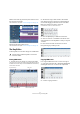
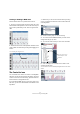

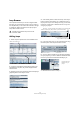


Table Of Contents
- English
- Table of Contents
- Introduction
- System requirements and installation
- Setting up your system
- Tutorial 1: Recording audio
- Tutorial 2: Editing audio
- Tutorial 3: Recording and editing MIDI
- Tutorial 4: Working with loops
- Tutorial 5: External MIDI instruments (Cubase only)
- Tutorial 6: Mixing and effects
- Tutorial 7: Surround production (Cubase only)
- Tutorial 8: Editing audio II - tempo and groove
- Tutorial 9: Media management
- Index
- Español
- Tabla de Contenidos
- Introducción
- Requisitos del sistema e instalación
- Configuración del sistema
- Tutorial 1: Grabación de audio
- Tutorial 2: Editar audio
- Tutorial 3: Grabar y editar MIDI
- Tutorial 4: Trabajar con loops
- Tutorial 5: Instrumentos MIDI externos (sólo Cubase)
- Tutorial 6: Mezclar y efectos
- Tutorial 7: Producción surround (sólo Cubase)
- Tutorial 8: Editar audio II - tempo y groove
- Tutorial 9: Gestión de medios
- Índice alfabético

42
Tutorial 3: Recording and editing MIDI
Browsing sounds
We are now going to load sounds into our virtual instrument
“HALionOne”.
1. Click the “Preset” button in “HALionOne” and choose
“Load Preset” from the pop-up menu.
2. In the window that appears, click the Categories but-
ton to display the Filter section.
3. In the “Category” section, make sure only “Strings” is
selected by deselecting anything else and clicking on
“Strings”. In the “Sub Category” click on “Synth”. You
have filtered the list to only show synth strings. Choose a
string sound from the list on the right.
MIDI recording
Now that we have our sound, let’s record something. Re-
cording MIDI is very similar to recording audio, see the
chapter “Tutorial 1: Recording audio” on page 23.
1. Make sure you have a MIDI keyboard connected to your
computer either directly through USB or a MIDI interface.
See the chapter “Setting up your system” on page 14 for information on
setting up MIDI in your computer.
2. We want to have our MIDI keyboard routed to this
track and play “HALionOne”. Make sure the Inspector is
shown so we can see our MIDI input and output routing.
3. Next, on the Input Routing pop-up menu, choose the
MIDI input you wish to use.
Most people leave this on “All MIDI Inputs” since you don’t have to worry
about which input is which. “All MIDI Inputs” takes the MIDI signal from
all your inputs and routes it to this track. There are some cases where
you wouldn’t want this but for 99% of the time you’ll be safe with this op-
tion selected.
4. Below the MIDI Input Routing pop-up menu, you can
set the MIDI output. This is set to our virtual instrument
“HALionOne”. If for any reason you need to change this to
another instrument you can do this here.
5. Activate the Record Enable and Monitor buttons on
the track and play some notes on your MIDI keyboard.
You should see and hear the MIDI signals coming in to the right of the
track.
Record Enabling the track lets Cubase know that you want to record on
this track. You can have many tracks Record Enabled at a time.
!
Load the project called “Recording MIDI 2” found in
the “Tutorial 3” folder.
Category Sub Category Filtered List
The MIDI Input Routing
pop-up menu
Record Enable
Monitor