
Quick Start

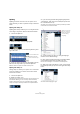
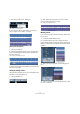

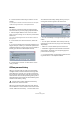

Table Of Contents
- English
- Table of Contents
- Introduction
- System requirements and installation
- Setting up your system
- Tutorial 1: Recording audio
- Tutorial 2: Editing audio
- Tutorial 3: Recording and editing MIDI
- Tutorial 4: Working with loops
- Tutorial 5: External MIDI instruments (Cubase only)
- Tutorial 6: Mixing and effects
- Tutorial 7: Surround production (Cubase only)
- Tutorial 8: Editing audio II - tempo and groove
- Tutorial 9: Media management
- Index
- Español
- Tabla de Contenidos
- Introducción
- Requisitos del sistema e instalación
- Configuración del sistema
- Tutorial 1: Grabación de audio
- Tutorial 2: Editar audio
- Tutorial 3: Grabar y editar MIDI
- Tutorial 4: Trabajar con loops
- Tutorial 5: Instrumentos MIDI externos (sólo Cubase)
- Tutorial 6: Mezclar y efectos
- Tutorial 7: Producción surround (sólo Cubase)
- Tutorial 8: Editar audio II - tempo y groove
- Tutorial 9: Gestión de medios
- Índice alfabético

39
Tutorial 2: Editing audio
4. Click the Process button and your audio is now nor-
malized.
For a description of the “More” and “Preview” buttons, see the chapter
“Audio Processing and Functions” in the Operation Manual.
Reverse
The “Reverse” command reverses the audio selection.
This will sound as if you were playing a tape backwards.
1. With the Object Selection tool, click on the audio
event you wish to change. In our case, let’s pick the bass
audio event.
You can also use the “Range Selection” tool and select the section of
audio you want.
2. On the Audio menu–Process submenu, select “Re-
verse”.
3. If you have copied events in the Project window, this di-
alog box will open. It asks if you want all the copied events
changed (Continue) or if a new version is to be created so
that only your selection is affected (New Version).
4. Clicking either “Continue” or “New Version” will re-
verse your audio.
Offline process history
When you process audio, the audio is not permanently
changed. Instead, Cubase remembers the changes and
stores backups of your files. You can then come back to
the processing, make changes, swap the processing with
other effects or remove all the processing entirely. This is
done behind the scenes and can be accessed through the
“Offline Process History” dialog.
We have processed the bass audio event with “Normal-
ize” and “Reverse”. Click on the bass event to select it and
choose “Offline Process History…” from the Audio menu.
The “Offline Process History” dialog shows you the pro-
cessing that has been applied to this audio event.
• You can click “Modify” to change the settings of “Nor-
malize”.
• You can replace “Normalize” with another process by
selecting the function from the pop-up menu and clicking
“Replace By”.
• “Remove” is used to delete a process from the list.
• “Deactivate” toggles the button between “Deactivate”
and “Activate”. This allows you to temporarily bypass a
process without removing it.
Ö For more information, see the chapter “Audio Process-
ing and Functions” in the Operation Manual.
!
Load the project called “Offline Process History”
found in the “Tutorial 2” folder.