
Quick Start

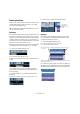
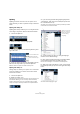
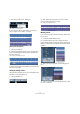

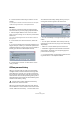

Table Of Contents
- English
- Table of Contents
- Introduction
- System requirements and installation
- Setting up your system
- Tutorial 1: Recording audio
- Tutorial 2: Editing audio
- Tutorial 3: Recording and editing MIDI
- Tutorial 4: Working with loops
- Tutorial 5: External MIDI instruments (Cubase only)
- Tutorial 6: Mixing and effects
- Tutorial 7: Surround production (Cubase only)
- Tutorial 8: Editing audio II - tempo and groove
- Tutorial 9: Media management
- Index
- Español
- Tabla de Contenidos
- Introducción
- Requisitos del sistema e instalación
- Configuración del sistema
- Tutorial 1: Grabación de audio
- Tutorial 2: Editar audio
- Tutorial 3: Grabar y editar MIDI
- Tutorial 4: Trabajar con loops
- Tutorial 5: Instrumentos MIDI externos (sólo Cubase)
- Tutorial 6: Mezclar y efectos
- Tutorial 7: Producción surround (sólo Cubase)
- Tutorial 8: Editar audio II - tempo y groove
- Tutorial 9: Gestión de medios
- Índice alfabético

38
Tutorial 2: Editing audio
Event envelopes
An envelope is a volume curve for an audio event. This al-
lows you to adjust the volume of the event over time.
1. Select the Pencil tool.
When you move the Pencil tool over an audio event, a small volume curve
symbol is shown next to the tool.
2. Click on the “Elec Guitar_01” event and notice that an
envelope point appears.
Clicking either high or low on the event will change the event volume to
either loud of soft.
3. Clicking further on will create more points.
As you create more and more envelope points, you are adjusting the vol-
ume of the event over time. The waveform reflects the changes you make.
Processing audio
Cubase has the ability to make changes to the audio in
more ways than splitting and resizing. You can normalize,
reverse, pitch shift and time stretch, to name a few. For a
full explanation on processing audio, see the chapter “Au-
dio processing and Functions” in the Operation Manual.
You can process the whole audio event or use the Range
Selection tool and select just the section of audio you want.
Let’s show you how to Normalize and Reverse an audio
event.
Normalize
Normalize raises the volume of the audio to the desired
amount. Usually you adjust the slider to “0” dB or “-1” dB
so that you get the maximum volume without clipping your
audio. A common use for Normalizing is to raise the level
of audio that was recorded at too low an input level.
Ö Please note that in some situations, this function may
lead to distortion. Therefore, you should use it carefully
and listen to the audio material afterwards, to make sure it
sounds as intended.
1. With the Object Selection tool, click on the audio
event you wish to change. Let’s pick the Bass audio event.
You can also use the Range Selection tool and select the section of au-
dio you want.
2. On the Audio menu–Process submenu, select “Nor-
malize”.
3. Adjust the slider to the amount you desire. A setting of
“0” db or “-1” db is common.
!
Load the project called “Event Operations 2” found
in the “Tutorial 2” folder. This project has all the event
operation changes you’ve learned so far.
!
Load the project called “Processing Audio” found in
the “Tutorial 2” folder.