
Quick Start
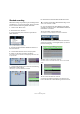

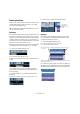
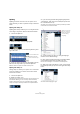
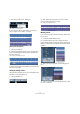

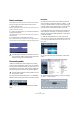
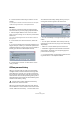
Table Of Contents
- English
- Table of Contents
- Introduction
- System requirements and installation
- Setting up your system
- Tutorial 1: Recording audio
- Tutorial 2: Editing audio
- Tutorial 3: Recording and editing MIDI
- Tutorial 4: Working with loops
- Tutorial 5: External MIDI instruments (Cubase only)
- Tutorial 6: Mixing and effects
- Tutorial 7: Surround production (Cubase only)
- Tutorial 8: Editing audio II - tempo and groove
- Tutorial 9: Media management
- Index
- Español
- Tabla de Contenidos
- Introducción
- Requisitos del sistema e instalación
- Configuración del sistema
- Tutorial 1: Grabación de audio
- Tutorial 2: Editar audio
- Tutorial 3: Grabar y editar MIDI
- Tutorial 4: Trabajar con loops
- Tutorial 5: Instrumentos MIDI externos (sólo Cubase)
- Tutorial 6: Mezclar y efectos
- Tutorial 7: Producción surround (sólo Cubase)
- Tutorial 8: Editar audio II - tempo y groove
- Tutorial 9: Gestión de medios
- Índice alfabético

34
Tutorial 2: Editing audio
Splitting
Splitting is used to cut events. You can split or cut an
event wherever you want or split them evenly to bars and
beats.
Splitting with “Snap” off
Splitting with “Snap” off allows you to cut anywhere with-
out locking to any kind of reference like bars and beats.
1. Choose the Split tool.
2. Make sure “Snap” is off (not highlighted).
3. You can now split or cut the audio anywhere by click-
ing on the event.
4. Undo your actions by choosing “Undo Split” from the
Edit menu as many times as you used the Split tool.
Make sure there are no splits in the “Bass” event any more.
Splitting with “Snap” on
Having “Snap” on allows you to split or cut to a time refer-
ence. For example, if you want to cut the “Elec Guitar”
track to bars or beats.
1. Choose the Split tool.
2. Make sure “Snap” is on.
Snap allows you to edit to various time frames. The most common one is
bars and beats. Meaning you can cut exactly to the bar with “Snap”
turned on. With it turned off you can cut anywhere. See more about
“Snap” in the chapter “The Project window” in the Operation Manual.
3. If you are having trouble seeing anything beyond the
“Tool Buttons”, right-click in the toolbar (the top bar that
the “Tool Buttons” are on).
This allows you to change what you see at the top of the Project window.
Customization is in the heart of Cubase.
4. Choose “Default” so that if you changed anything it
will return to the default settings.
5. Next, right click again and choose “Automation Mode”
so that the automation tools are hidden from view.
Now we can see enough for us to continue on with the Split tool.
6. With most of the snap features in view, choose “Grid”
from the Snap mode pop-up menu to the right of the Snap
button.
This means we’ll be snapping to a grid.
The vertical blue lines
indicate where the
Bass event was split.
There is more to see
but your screen res-
olution may prevent
you from seeing
everything.
Right-click in the toolbar.