
Quick Start


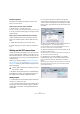
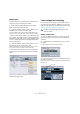
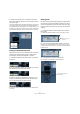
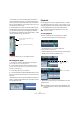
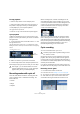
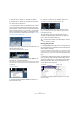
Table Of Contents
- English
- Table of Contents
- Introduction
- System requirements and installation
- Setting up your system
- Tutorial 1: Recording audio
- Tutorial 2: Editing audio
- Tutorial 3: Recording and editing MIDI
- Tutorial 4: Working with loops
- Tutorial 5: External MIDI instruments (Cubase only)
- Tutorial 6: Mixing and effects
- Tutorial 7: Surround production (Cubase only)
- Tutorial 8: Editing audio II - tempo and groove
- Tutorial 9: Media management
- Index
- Español
- Tabla de Contenidos
- Introducción
- Requisitos del sistema e instalación
- Configuración del sistema
- Tutorial 1: Grabación de audio
- Tutorial 2: Editar audio
- Tutorial 3: Grabar y editar MIDI
- Tutorial 4: Trabajar con loops
- Tutorial 5: Instrumentos MIDI externos (sólo Cubase)
- Tutorial 6: Mezclar y efectos
- Tutorial 7: Producción surround (sólo Cubase)
- Tutorial 8: Editar audio II - tempo y groove
- Tutorial 9: Gestión de medios
- Índice alfabético

30
Tutorial 1: Recording audio
3. Double-click on “Audio 01” and rename it “Bass”.
4. Double-click on “Audio 02” and rename it “Elec Gui-
tar”. That looks a lot better now.
• It’s always good to name your tracks before you start to
record. This way the audio event too will take this name.
Since “Audio 01” was the name of our first track the audio
event is named “Audio 01_01”. The suffix “_01” being the
first event recorded on the “Audio 01” track. We’ll show
you how to rename your audio files in the chapter “Tutorial
2: Editing audio” on page 32.
5. Make sure “Cycle” is activated, set the left locator to 2
and the right locator to 18.
This will loop or cycle between bars 2 and 18.
6. On the Transport panel, make sure “Mix (MIDI)” is se-
lected for the “Cycle Record Mode”.
This will allow us to record the electric guitar, and as each cycle repeats
a new take will be created. We will then choose the best take to keep as
our guitar line.
7. Activate the Record Enable and Monitor buttons on
the “Elec Guitar” track.
8. Click the “L” button on the Transport panel once.
This will make sure we start recording at the left locator.
9. Click the “Record” button on the Transport panel.
As you record the guitar, let the cycle repeat three times so we have
three different guitar takes.
10. Click “Stop” when you’re finished. We’ve just re-
corded three different guitar takes. Now let’s figure out
how to select the best sounding one.
Selecting different takes
1. Holding [Alt]/[Option], right-click on the new guitar au-
dio event that we just recorded and choose a take from the
“Set to Region” submenu.
If you right-click without holding a modifier key, you will see the toolbox
instead of the context menu. This behavior is determined by the “Popup
Toolbox on Right Click” option in the Preferences dialog (Editing–Tools
page).
Cubase has recorded all of the passes we made when we
were recording in loop mode (Cycle Recording). These
passes are called “Takes”. In our example we have three
different guitar takes. We can pick between them and
choose which one sounds best.
2. Listen to the different takes and when you are done,
choose “Take 1”.
Cycle Record Mode
!
Load the tutorial called “Cycle Recording 2” found in
the “Tutorial 1” folder.
Current take Available takes