
Quick Start


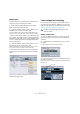
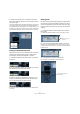
Table Of Contents
- English
- Table of Contents
- Introduction
- System requirements and installation
- Setting up your system
- Tutorial 1: Recording audio
- Tutorial 2: Editing audio
- Tutorial 3: Recording and editing MIDI
- Tutorial 4: Working with loops
- Tutorial 5: External MIDI instruments (Cubase only)
- Tutorial 6: Mixing and effects
- Tutorial 7: Surround production (Cubase only)
- Tutorial 8: Editing audio II - tempo and groove
- Tutorial 9: Media management
- Index
- Español
- Tabla de Contenidos
- Introducción
- Requisitos del sistema e instalación
- Configuración del sistema
- Tutorial 1: Grabación de audio
- Tutorial 2: Editar audio
- Tutorial 3: Grabar y editar MIDI
- Tutorial 4: Trabajar con loops
- Tutorial 5: Instrumentos MIDI externos (sólo Cubase)
- Tutorial 6: Mezclar y efectos
- Tutorial 7: Producción surround (sólo Cubase)
- Tutorial 8: Editar audio II - tempo y groove
- Tutorial 9: Gestión de medios
- Índice alfabético

29
Tutorial 1: Recording audio
To stop playback
• Click the “Stop” button on the Transport panel.
• Clicking the “Stop” button twice moves the cursor to
the position in the project where you started playback.
• Press [Space] on your computer keyboard.
This toggles between stop and start.
• Press the “0” key of the numerical computer keypad.
Cycle playback
Cubase has the ability to loop or cycle a section of your
project. To set the cycle location you need to use the left
and right locator.
1. On the Transport panel, set the left locator to “1” and
the right locator to “5”.
This tells Cubase that we want to loop or cycle between bars 1 and 5.
Meaning we will have a 4 bar loop since the end of bar 4 is the beginning
of bar 5.
2. Make sure that the “Cycle” button is activated.
3. Click the Play button on the Transport panel and Cu-
base will play looping over and over until you click “Stop”.
Recording modes with cycle off
There are three different modes for recording when the
cycle is turned off. This is called linear recording. The
three modes are:
• Normal
• Merge
• Replace
When recording audio, “Normal” and “Merge” are the
same. Selecting either of these will allow you to record
over the top of another audio event and it will appear as an
overlap. You can then select between the overlapping
events and determine which one will play. This is dis-
cussed in the following section.
“Replace” mode when used will not overlap the audio if
there is already some on the track. It will split or cut the
audio where the recording takes place replacing what was
there previously. Keep in mind though that the audio being
replaced is not permanently deleted. It is only cut or
trimmed away allowing you to recover it later.
Cycle recording
You can record audio while “cycle” is on.
So far we’ve shown you how to add tracks, record and
playback. Now we are going to add an electric guitar to
our bass guitar using cycle recording. Recording with cy-
cle on allows us to make multiple passes of our recording
and then pick the best take.
If you haven’t reviewed the previous sections in this tuto-
rial, please do as we are going to move a little faster now.
Recording electric guitar
1. Let’s add another “Mono” audio track.
This is described in the section “Adding a mono track” on page 26.
2. You can see now that we have a track called “Audio
01” and “Audio 02”. Up to now we haven’t been con-
cerned about naming the tracks but let’s do this now.
!
Don’t forget – you can set the locators to encom-
pass the selected event, turn on “Cycle” and begin
playback all by the key command [Shift]-[G].
The left locator set to “1”.
The right locator set to “5”.
Cycle
activated.
!
Load the project called “Cycle Recording” found in
the “Tutorial 1” folder.