
Quick Start


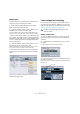
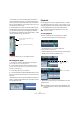
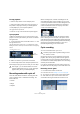
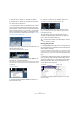
Table Of Contents
- English
- Table of Contents
- Introduction
- System requirements and installation
- Setting up your system
- Tutorial 1: Recording audio
- Tutorial 2: Editing audio
- Tutorial 3: Recording and editing MIDI
- Tutorial 4: Working with loops
- Tutorial 5: External MIDI instruments (Cubase only)
- Tutorial 6: Mixing and effects
- Tutorial 7: Surround production (Cubase only)
- Tutorial 8: Editing audio II - tempo and groove
- Tutorial 9: Media management
- Index
- Español
- Tabla de Contenidos
- Introducción
- Requisitos del sistema e instalación
- Configuración del sistema
- Tutorial 1: Grabación de audio
- Tutorial 2: Editar audio
- Tutorial 3: Grabar y editar MIDI
- Tutorial 4: Trabajar con loops
- Tutorial 5: Instrumentos MIDI externos (sólo Cubase)
- Tutorial 6: Mezclar y efectos
- Tutorial 7: Producción surround (sólo Cubase)
- Tutorial 8: Editar audio II - tempo y groove
- Tutorial 9: Gestión de medios
- Índice alfabético

27
Tutorial 1: Recording audio
4. Make sure that “Mono In” is selected for the audio
track’s input and that “Stereo Out” is selected for the au-
dio tracks output.
You may have different inputs and outputs depending on your audio hard-
ware. See the chapter “VST Connections” in the Operation Manual for
more detailed information. By setting “Mono In”, we will be able to record
the audio from the left input of our audio card into a track in Cubase. Set-
ting the output to “Stereo Out” allows us to hear what we are recording.
Turning on the metronome click
We’ll want to have a click or metronome play in the back-
ground as we record the bass guitar so that what we
record aligns with the bars and beats in Cubase.
1. Activate the “Metronome/Click” button on the Trans-
port panel.
2. If you would like a two bar count in before you record,
also activate the “Precount/Click” button.
3. We now need to set the speed or the tempo of our
project. This will directly affect how fast the click plays.
You can set the tempo just below the click.
In this picture, we have a setting of 125, which means 125bpm (beats
per minute).
Setting levels
We have a bass guitar playing through an amplifier with a
microphone in front of the amplifier’s speaker. This micro-
phone is plugged directly into the audio card’s input. We
have set the level so that we have enough volume without
clipping.
1. Clicking the Monitor button will allow us to hear the
bass guitar.
You should see and hear the audio coming in to the right of the track.
2. Now click the “Record Enable” button on the track.
Setting the track to Record Enable lets Cubase know that you want to
record on this track and no other one. You can have many tracks Record
Enabled at a time.
3. In the Inspector, open the “Channel” tab.
This will display the channel fader for the selected track.
Audio coming into
this track.
Click here to display the
channel fader.