
Quick Start


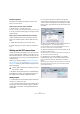
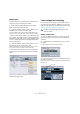
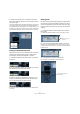
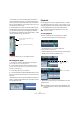
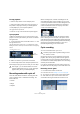
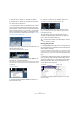
Table Of Contents
- English
- Table of Contents
- Introduction
- System requirements and installation
- Setting up your system
- Tutorial 1: Recording audio
- Tutorial 2: Editing audio
- Tutorial 3: Recording and editing MIDI
- Tutorial 4: Working with loops
- Tutorial 5: External MIDI instruments (Cubase only)
- Tutorial 6: Mixing and effects
- Tutorial 7: Surround production (Cubase only)
- Tutorial 8: Editing audio II - tempo and groove
- Tutorial 9: Media management
- Index
- Español
- Tabla de Contenidos
- Introducción
- Requisitos del sistema e instalación
- Configuración del sistema
- Tutorial 1: Grabación de audio
- Tutorial 2: Editar audio
- Tutorial 3: Grabar y editar MIDI
- Tutorial 4: Trabajar con loops
- Tutorial 5: Instrumentos MIDI externos (sólo Cubase)
- Tutorial 6: Mezclar y efectos
- Tutorial 7: Producción surround (sólo Cubase)
- Tutorial 8: Editar audio II - tempo y groove
- Tutorial 9: Gestión de medios
- Índice alfabético

25
Tutorial 1: Recording audio
To open a project
Now that we have saved and closed your project, let’s
show you how to open it.
Open a project using the “Open” command
1. Select “Open…” from the “File” menu.
Here you can navigate to the folder that has the project you wish to open.
2. Once you have found the project click “Open” and the
project will load.
Open a project using the “Recent Projects” submenu
Cubase remembers recently opened projects and lists
them in the “Recent Projects” submenu under the “File”
menu.
1. Select “Recent Projects” from the “File” menu.
2. Select the project you wish to open by clicking once
on it.
Setting up the VST connections
The VST Connections window allows you to set up the in-
put and output signals of Cubase to your audio card. Cu-
base calls these “busses”. This section will show you how
to set the busses up so that you can get playback and re-
cording working.
Make sure you read the chapters “System requirements
and installation” on page 9 and “Setting up your system”
on page 14, so that your audio hardware is properly set up
before proceeding.
Ö By default, the tutorial projects are not installed during
the installation of Cubase. You will find these projects on
the program DVD, in the folder “Additional Content”.
Adding outputs
1. Open the Devices menu and select “VST Connections”.
The default key command for this is [F4].
• You’ll see several tabs at the top of the window. We’re
only going to cover Input and Output right now. See the
chapter “VST Connections” in the Operation Manual for
more details.
2. Let’s choose “Output” first. We want to start from
scratch and remove anything that is currently there, just in
case it’s set up incorrectly. If you see anything in the “Bus
Name” column, right-click with the mouse and select “Re-
move Bus”.
3. Now click the “Add Bus” button. Choose “Stereo” for
configuration and “1” for count and click OK.
This has now added a new stereo bus (Left and Right) allowing us to
have audio in Cubase routed to our audio hardware.
4. Since we mainly listen to our music as a stereo mix, all
we need is a stereo output.
We can still listen to music with more than 2 channels, for example, if us-
ing a surround sound setup (Cubase only).
5. Depending on your audio hardware, your outputs
should be set up now. You can however select the out-
puts of your choice from the “Device Port” pull down
menu.
Normally you’ll want to choose the main stereo outputs of your audio card.
More sophisticated setups may require you to choose different outputs
and even add more busses.
!
Load the project called “VST Connections” found in
the “Tutorial 1” folder.