
Quick Start


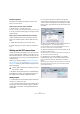
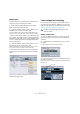
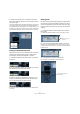
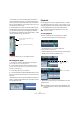
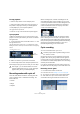
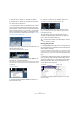
Table Of Contents
- English
- Table of Contents
- Introduction
- System requirements and installation
- Setting up your system
- Tutorial 1: Recording audio
- Tutorial 2: Editing audio
- Tutorial 3: Recording and editing MIDI
- Tutorial 4: Working with loops
- Tutorial 5: External MIDI instruments (Cubase only)
- Tutorial 6: Mixing and effects
- Tutorial 7: Surround production (Cubase only)
- Tutorial 8: Editing audio II - tempo and groove
- Tutorial 9: Media management
- Index
- Español
- Tabla de Contenidos
- Introducción
- Requisitos del sistema e instalación
- Configuración del sistema
- Tutorial 1: Grabación de audio
- Tutorial 2: Editar audio
- Tutorial 3: Grabar y editar MIDI
- Tutorial 4: Trabajar con loops
- Tutorial 5: Instrumentos MIDI externos (sólo Cubase)
- Tutorial 6: Mezclar y efectos
- Tutorial 7: Producción surround (sólo Cubase)
- Tutorial 8: Editar audio II - tempo y groove
- Tutorial 9: Gestión de medios
- Índice alfabético

24
Tutorial 1: Recording audio
Creating a new project
In this section we are going to explain how to create a new
project, save a project and open a saved project.
When you first open Cubase, an empty screen appears
before you. You need to either create a new project or
open an existing one.
To create a new project
1. Let’s create a new project by selecting “New Project”
from the “File” menu.
2. The Templates dialog opens.
Templates are described in the “File Handling” chapter in the Operation
Manual.
3. Select “Empty”.
This will create a new project with nothing in it.
4. Click “OK”.
5. Cubase now wants to create a folder on the hard drive
so that your Cubase project file and all of its related files
are stored in one safe place.
It is important that every project gets stored in its own folder. Having many
different projects stored in the same folder only leads to confusion later on.
6. Navigate to where you would like this project to be
created.
Ö You are not saving the project at this point! You are
creating a folder on the hard drive that your project will get
saved into later. This will be explained very shortly.
7. Click “Make New Folder” on the PC or “New Folder”
on the Mac to create a new folder for your project.
8. Follow the usual procedure for your operating system
(Windows or Mac) to give your new folder a name.
If your are going to name your project “My First Project” then you could
call this folder “My First Project” or “First Project”. What’s important here
is that you are creating a folder on the hard drive to store your project
into it. This folder should have a unique name.
9. Click “OK” on the PC or “Open” on the Mac.
10. You should be looking at your very first project in Cu-
base now. Congratulations!
If you look at the top of the window in Cubase (called the Project window)
you’ll see the name of this project is “Untitled1”.
To save a project
1. Select “Save As…” from the File menu.
The difference between Save and Save As is discussed in the chapter
“File Handling” in the Operation Manual.
2. You will notice that Cubase is in the “My First Project”
folder that you created earlier. This is where you want to
save your project. Type in a name for your Project – you
can use “My First Cubase Project” for example.
3. Click “Save” – and that’s it!
To close a project
1. Make sure the Project window is selected.
The Project window is the main window that you work in. See the chap-
ter “The Project window” in the Operation Manual.
2. Select “Close” from the “File” menu.
If you have made any changes to the project since you last saved it, you
will be prompted to “Save”, “Don’t Save” or “Cancel”. Click “Save” if you
want your changes saved.
!
You’re not done yet!
So far we’ve created a blank Cubase project. We
have a folder sitting on the hard drive but we haven’t
saved the actual Cubase project yet.
The name of the project