
Quick Start

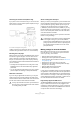
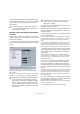


Table Of Contents
- English
- Table of Contents
- Introduction
- System requirements and installation
- Setting up your system
- Tutorial 1: Recording audio
- Tutorial 2: Editing audio
- Tutorial 3: Recording and editing MIDI
- Tutorial 4: Working with loops
- Tutorial 5: External MIDI instruments (Cubase only)
- Tutorial 6: Mixing and effects
- Tutorial 7: Surround production (Cubase only)
- Tutorial 8: Editing audio II - tempo and groove
- Tutorial 9: Media management
- Index
- Español
- Tabla de Contenidos
- Introducción
- Requisitos del sistema e instalación
- Configuración del sistema
- Tutorial 1: Grabación de audio
- Tutorial 2: Editar audio
- Tutorial 3: Grabar y editar MIDI
- Tutorial 4: Trabajar con loops
- Tutorial 5: Instrumentos MIDI externos (sólo Cubase)
- Tutorial 6: Mezclar y efectos
- Tutorial 7: Producción surround (sólo Cubase)
- Tutorial 8: Editar audio II - tempo y groove
- Tutorial 9: Gestión de medios
- Índice alfabético

16
Setting up your system
Connecting for surround sound (Cubase only)
If you plan to mix for surround sound, you can connect the
audio outputs to a multi-channel power amplifier, driving a
set of surround channels.
A surround sound playback configuration
Cubase supports surround formats with up to 6 speaker
channels. The figure above shows a 5.1 surround setup.
Recording from a CD player
Most computers come with a CD-ROM drive that can also
be used as a regular CD player. In some cases the CD
player is internally connected to the audio hardware so
that you can record the output of the CD player directly
into Cubase (consult the audio hardware documentation if
you are uncertain).
• All routing and level adjustments for recording from a CD (if
available) are done in the audio hardware setup application
(see below).
• You can also grab audio tracks directly from a CD in Cubase
(see the chapter “File Handling” in the Operation Manual).
Word Clock connections
If you are using a digital audio connection, you may also
need a word clock connection between the audio hard-
ware and external devices. Please refer to the documenta-
tion that came with the audio hardware for details.
About recording levels and inputs
When you connect your equipment, you should make sure
that the impedance and levels of the audio sources and in-
puts are matched. Typically, different inputs may be de-
signed for use with microphones, consumer line level
(-10dBV) or professional line level (+4dBV), or you may
be able to adjust input characteristics on the audio inter-
face or in its control panel. Please check the audio hard-
ware documentation for details.
Using the correct types of input is important to avoid dis-
tortion or noisy recordings.
Making settings for the audio hardware
Most audio cards come with one or more small applica-
tions that allow you to configure the inputs of the hard-
ware to your liking. This includes:
• Selecting which inputs/outputs are active.
• Setting up word clock synchronization (if available).
• Turning monitoring via the hardware on/off (see “About moni-
toring” on page 19).
• Setting levels for each input. This is very important!
• Setting levels for the outputs, so that they match the equip-
ment you use for monitoring.
• Selecting digital input and output formats.
• Making settings for the audio buffers.
In many cases all available settings for the audio hardware
are gathered in a control panel, which can be opened from
within Cubase as described below (or opened separately,
when Cubase isn’t running). In some cases, there may be
several different applications and panels – please refer to
the audio hardware documentation for details.
Plug and Play support for ASIO devices
The Steinberg MR816 hardware series supports Plug and
Play in Cubase. These devices can be plugged in and
switched on while the application is running. Cubase will
automatically use the driver of the MR816 series and will
re-map the VST connections accordingly.
!
It is very important that word clock synchronization is
done correctly or there might be clicks and crackles
in recordings that you make!
!
Cubase does not provide any input level adjustments
for the signals coming in to your audio hardware,
since these are handled differently for each card. Ad-
justing input levels is either done in a special applica-
tion included with the hardware or from its control
panel (see below).