
Plug-in Reference

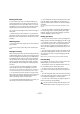
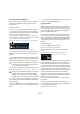

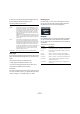
Table Of Contents
- Table of Contents
- The included effect plug-ins
- Introduction
- Delay plug-ins
- ModMachine (Cubase only)
- MonoDelay
- PingPongDelay
- StereoDelay
- Distortion plug-ins
- AmpSimulator
- DaTube
- Distortion
- SoftClipper (Cubase only)
- Dynamics plug-ins
- Compressor
- DeEsser (Cubase only)
- EnvelopeShaper (Cubase only)
- Expander (Cubase only)
- Gate
- Limiter
- Maximizer
- MIDI Gate
- MultibandCompressor (Cubase only)
- VintageCompressor (Cubase only)
- VSTDynamics
- EQ plug-ins
- GEQ-10/GEQ-30 (Cubase only)
- StudioEQ (Cubase only)
- Filter plug-ins
- DualFilter
- StepFilter
- ToneBooster
- Tonic - Analog Modeling Filter (Cubase only)
- WahWah
- Mastering - UV 22 HR
- Modulation plug-ins
- AutoPan
- Chorus
- Cloner (Cubase only)
- Flanger
- Metalizer
- Phaser
- Ringmodulator
- Rotary
- StudioChorus
- Tranceformer
- Tremolo
- Vibrato
- Other plug-ins
- Bitcrusher
- Chopper
- Octaver
- Tuner
- PitchShift - Pitch Correct
- Restoration plug-ins - Grungelizer
- Reverb plug-ins
- REVerence (Cubase only)
- RoomWorks
- RoomWorks SE
- Spatial plug-ins
- MonoToStereo
- StereoEnhancer
- Surround plug-ins (Cubase only)
- Mix6To2 (Cubase only)
- SurroundPan (Cubase only)
- Tools plug-ins
- MultiScope (Cubase only)
- SMPTEGenerator (Cubase only)
- TestGenerator (Cubase only)
- The included VST Instruments
- Introduction
- Prologue
- Sound parameters
- Modulation and controllers
- Spector (Cubase only)
- Sound parameters
- Modulation and controllers
- Mystic (Cubase only)
- Sound parameters
- Modulation and controllers
- HALionOne
- Groove Agent ONE
- LoopMash (Cubase only)
- Embracer - Surround Pad Synthesizer (Cubase only)
- Monologue - Monophonic Analog Modeling Synthesizer (Cubase only)
- Diagrams
- MIDI effects
- Index

97
MIDI effects
Converting patterns into MIDI parts
You can convert the drum patterns created in the Beat
Designer into a MIDI part by dragging them into the
Project window.
Proceed as follows:
1. Set up one or more patterns of the same subbank.
2. In the lower part of the window, click on a pattern or
subbank and drag it at the desired position onto a MIDI or
instrument track in the Project window.
If you drag the pattern or subbank to an empty area in the Project win-
dow, a new MIDI track is created. This will be an exact copy of the origi-
nal track for which you opened the Beat Designer.
• If you drag a single pattern into the Project window, one
MIDI part is created containing the drum sounds of the
pattern.
• If you drag a subbank into the Project window, several
MIDI parts (one for each used pattern in the subbank) are
created and inserted one after the other in the project.
You can also use the Edit menu to insert patterns or sub-
banks into the project, see “The Edit menu” on page 95.
• If you import patterns that sound before the first step
(due to flams or lane offsets), the MIDI part will be length-
ened accordingly.
The inserted MIDI parts can now be edited as usual in the
project. You can e.g. fine-tune your settings in the Drum
Editor.
Ö Once a pattern is converted into a MIDI part, it cannot
be opened in the Beat Designer again.
Triggering patterns
When you want to be able to modify your drum patterns in
the Beat Designer while working on the project, you can-
not convert them into parts, as these cannot be opened
again in the Beat Designer. Instead, you can trigger the
patterns from within the project.
You can trigger the patterns in the Beat Designer using
Note On events. These can either be events on a MIDI
track or be played live via a MIDI keyboard. Which pattern
will be triggered depends on the pitch of the MIDI notes.
The trigger range is four octaves starting with C1 (i.e. C1
to B4).
Proceed as follows:
1. Open the Beat Designer for a track.
Again, this can be a MIDI or an instrument track.
2. Click to the left of the Jump field to activate Jump
mode.
In this mode, a MIDI note-on event will trigger a new pattern.
• When you want to trigger the patterns using a MIDI part
containing trigger events, you can specify whether the
pattern will be switched directly (at the moment the event
is received) or at the next bar: Click in the field to the right
(where it says “Now”) to activate the immediate switching
of patterns. When this is activated, the word Now is dis-
played in white. When the word Now is black, patterns will
switch at the beginning of the next bar in the project.
• When you want to trigger the patterns “live” via a MIDI
keyboard, the new patterns are always played when the
next bar in the project is reached.
Switching immediatelly would always produce an undesirable interrup-
tion in playback.
Now, you can trigger the patterns in the following way:
1. Play back the project and press a key on your MIDI key-
board to trigger the next pattern.
The pattern will start at the next bar line.
!
Only the used patterns in a subbank are inserted, i.e.
if you did not enter drum steps in a pattern, this will
not be converted into a MIDI part.
!
When you have created MIDI parts for your drum pat-
terns this way, make sure to deactivate the Beat
Designer, to avoid doubling of the drums. The Beat
Designer will continue to play as long as it is activated.
Click here and drag to convert this subbank into separate MIDI parts.
Click here and drag to convert this pattern into a MIDI part.
Click here to activate Jump mode.