
Plug-in Reference

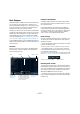
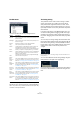

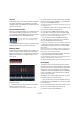
Table Of Contents
- Table of Contents
- The included effect plug-ins
- Introduction
- Delay plug-ins
- ModMachine (Cubase only)
- MonoDelay
- PingPongDelay
- StereoDelay
- Distortion plug-ins
- AmpSimulator
- DaTube
- Distortion
- SoftClipper (Cubase only)
- Dynamics plug-ins
- Compressor
- DeEsser (Cubase only)
- EnvelopeShaper (Cubase only)
- Expander (Cubase only)
- Gate
- Limiter
- Maximizer
- MIDI Gate
- MultibandCompressor (Cubase only)
- VintageCompressor (Cubase only)
- VSTDynamics
- EQ plug-ins
- GEQ-10/GEQ-30 (Cubase only)
- StudioEQ (Cubase only)
- Filter plug-ins
- DualFilter
- StepFilter
- ToneBooster
- Tonic - Analog Modeling Filter (Cubase only)
- WahWah
- Mastering - UV 22 HR
- Modulation plug-ins
- AutoPan
- Chorus
- Cloner (Cubase only)
- Flanger
- Metalizer
- Phaser
- Ringmodulator
- Rotary
- StudioChorus
- Tranceformer
- Tremolo
- Vibrato
- Other plug-ins
- Bitcrusher
- Chopper
- Octaver
- Tuner
- PitchShift - Pitch Correct
- Restoration plug-ins - Grungelizer
- Reverb plug-ins
- REVerence (Cubase only)
- RoomWorks
- RoomWorks SE
- Spatial plug-ins
- MonoToStereo
- StereoEnhancer
- Surround plug-ins (Cubase only)
- Mix6To2 (Cubase only)
- SurroundPan (Cubase only)
- Tools plug-ins
- MultiScope (Cubase only)
- SMPTEGenerator (Cubase only)
- TestGenerator (Cubase only)
- The included VST Instruments
- Introduction
- Prologue
- Sound parameters
- Modulation and controllers
- Spector (Cubase only)
- Sound parameters
- Modulation and controllers
- Mystic (Cubase only)
- Sound parameters
- Modulation and controllers
- HALionOne
- Groove Agent ONE
- LoopMash (Cubase only)
- Embracer - Surround Pad Synthesizer (Cubase only)
- Monologue - Monophonic Analog Modeling Synthesizer (Cubase only)
- Diagrams
- MIDI effects
- Index

96
MIDI effects
Adding flams
The Flam parameter lets you add flams (short secondary
drum hits just before or after the actual main drum beat).
You can add up to three flams for each pattern step:
1. Click in the lower left corner of the step you want to
add a flam to.
Little squares appear in the step when you point with the mouse at the
step. After you clicked, the first square becomes filled to indicate that
you added a flam.
2. Click again to add the second and third flam, if needed.
3. In the lower left section of the Beat Designer panel
you can make settings for the flams you created.
• The first (topmost) Position slider specifies the flam po-
sition for all steps containing one single flam, the second
slider the flam positions for all steps containing two flams,
and the third slider the flam position for all steps contain-
ing three flams.
• Drag a Position slider to the left to add the flams before
the drum step and to the right to add them after the step.
• When you add flams before the very first drum step in a
pattern, this is indicated in the display by a small arrow in
the top left corner of this step. This indicates that you have
to treat this pattern with special care in playback and ar-
ranging. Starting playback at the normal pattern start
would result in these flams not being played.
• Use the vertical sliders to the right of the flam sliders to
set the velocity for the flams.
4. Start playback to hear the flams you created.
Offsetting lanes
To the right of the step display, you can find the Offset
sliders for the lanes. These allow you to offset all drum
steps on this lane. Drag a slider to the left to make the
drum steps start a little earlier and to the right to let them
start later.
Playing e.g. the bass drum or snare a little earlier allows
you to add more “urgency” to the drums, delaying these
drum sounds will result in a more relaxed drum pattern.
Experiment with the settings to find out which fit best in
your project.
Note that this function can also be used to correct faulty
drum samples: If a drum sound has an attack that is slightly
late, simply adjust the Offset slider for the lane.
Saving and loading presets
You can save all 48 Beat Designer patterns as a pattern
bank. This can then be loaded in other projects. Pattern
banks contain all the step and lane settings for a pattern
(Mute and Solo, number and order of the lanes, pitch, etc.).
To save a pattern bank, proceed as follows:
1. In the Beat Designer, click on the Preset Management
button to the right of the preset name field.
2. On the pop-up menu select “Save Preset”.
A dialog appears.
3. Enter a name for the preset and click OK.
The preset will now be available on the Preset browser, in
the MediaBay and on the Apply Track preset pop-up
menu in the Track list.
Pattern banks are handled much like Track presets in the
MediaBay. For further information, refer to the chapters
“The MediaBay” and “Track Presets” in the Operation
Manual.
Using the drum patterns in your project
You can use the drum patterns created with the Beat
Designer in two ways: either by converting them to MIDI
parts on a MIDI or Instrument track or by triggering the dif-
ferent patterns using MIDI notes.
Click here to add up to three flams to the step.
With these sliders, you can specify the velocity for the separate flams.
Here, you can specify the flam positions for all steps containing one,
two and three flams, respectively.