
Plug-in Reference

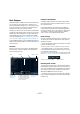
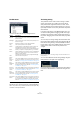

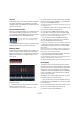
Table Of Contents
- Table of Contents
- The included effect plug-ins
- Introduction
- Delay plug-ins
- ModMachine (Cubase only)
- MonoDelay
- PingPongDelay
- StereoDelay
- Distortion plug-ins
- AmpSimulator
- DaTube
- Distortion
- SoftClipper (Cubase only)
- Dynamics plug-ins
- Compressor
- DeEsser (Cubase only)
- EnvelopeShaper (Cubase only)
- Expander (Cubase only)
- Gate
- Limiter
- Maximizer
- MIDI Gate
- MultibandCompressor (Cubase only)
- VintageCompressor (Cubase only)
- VSTDynamics
- EQ plug-ins
- GEQ-10/GEQ-30 (Cubase only)
- StudioEQ (Cubase only)
- Filter plug-ins
- DualFilter
- StepFilter
- ToneBooster
- Tonic - Analog Modeling Filter (Cubase only)
- WahWah
- Mastering - UV 22 HR
- Modulation plug-ins
- AutoPan
- Chorus
- Cloner (Cubase only)
- Flanger
- Metalizer
- Phaser
- Ringmodulator
- Rotary
- StudioChorus
- Tranceformer
- Tremolo
- Vibrato
- Other plug-ins
- Bitcrusher
- Chopper
- Octaver
- Tuner
- PitchShift - Pitch Correct
- Restoration plug-ins - Grungelizer
- Reverb plug-ins
- REVerence (Cubase only)
- RoomWorks
- RoomWorks SE
- Spatial plug-ins
- MonoToStereo
- StereoEnhancer
- Surround plug-ins (Cubase only)
- Mix6To2 (Cubase only)
- SurroundPan (Cubase only)
- Tools plug-ins
- MultiScope (Cubase only)
- SMPTEGenerator (Cubase only)
- TestGenerator (Cubase only)
- The included VST Instruments
- Introduction
- Prologue
- Sound parameters
- Modulation and controllers
- Spector (Cubase only)
- Sound parameters
- Modulation and controllers
- Mystic (Cubase only)
- Sound parameters
- Modulation and controllers
- HALionOne
- Groove Agent ONE
- LoopMash (Cubase only)
- Embracer - Surround Pad Synthesizer (Cubase only)
- Monologue - Monophonic Analog Modeling Synthesizer (Cubase only)
- Diagrams
- MIDI effects
- Index

94
MIDI effects
Entering drum steps
To enter a drum step, click on the step field where you
want to add a beat. You could e.g. add a snare drum on
each downbeat for a lane and a bass drum on a second
lane. When you click in an empty field, it becomes “filled”,
indicating that you will hear a drum beat on this step.
You can also click and drag to enter a continuous range of
drum steps.
Ö When working on drum patterns, it is a good idea to
play back a section of the project in a loop while inserting
the drum sounds, as this allows you to hear the result im-
mediately.
Removing steps
• To remove a drum step, simply click on the correspond-
ing field again.
• To remove a range of drum steps, click and drag over
them.
Setting the velocity
When entering a drum step, the velocity setting of this step
is determined by where you click: Click in the upper part of
a step for the highest velocity setting, in the middle section
for a medium velocity and in the lower part for the lowest
velocity setting. This is a quick way of roughly setting the
velocity on the fly while entering drum sounds. In the dis-
play, the different velocity settings are indicated by differ-
ent colors.
• You can fine-tune the velocity setting for an existing
drum step by clicking on it and dragging up or down.
The current velocity is indicated numerically while you drag, allowing you
to find the desired setting easily. The available range is from 1 to 127.
• You can also fine-tune the velocity for a range of drum
steps. Click on the first step, drag up or down to enter into
velocity edit mode, and then drag sideways and up or
down to modify the velocity for all the steps.
• If you hold down [Shift] while dragging up or down, you
can change the velocity for all steps on a lane.
Ö If you change the velocity for several steps at the same
time, the relative velocity differences will be kept for as
long as possible (until the minimum or maximum setting is
reached).
The velocity for the steps will be increased or decreased by the same
amount.
• You can also create a crescendo (or decrescendo) for
an existing range of drum steps by holding down [Alt]/
[Option], clicking on the first step, dragging up or down
and then dragging to the left or right.
Editing operations
• You can move all drum steps on a lane by holding down
[Shift], clicking on the lane and dragging to the left or right.
• You can also “invert” a lane, i.e. add drum sounds for all
steps that were empty while removing all existing drum
steps. This lets you create unusual rhythmic patterns. To
do so, hold down [Alt]/[Option] and drag the mouse over
the lane.
• You can copy the content of a lane onto another lane by
holding down [Alt]/[Option], clicking in the section to the
left of the lane you want to copy and dragging to the de-
sired position.
When you drag, a vertical line and a plus symbol will be displayed.
Lane handling
If you find that you have too many or too few lanes in the
Beat Designer, you can add or remove them.
• To add a lane, click on the “Add Instrument Lane” but-
ton at the bottom right of the last lane shown.
• To remove a lane, click on the “Remove Instrument
Lane” button in the controls section at the far right of the
lane.
• You can change the order of the drum lanes by clicking
in an empty area in the section to the left of a lane (i.e. not
on a button) and dragging it to another position.
• You can mute or solo a lane by clicking the respective
buttons to the left of the step display.
!
The lane operations always affect all patterns in the
Beat Designer instance, not only the one you edit.