
Plug-in Reference

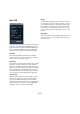
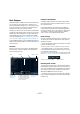
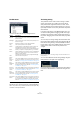
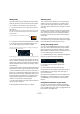

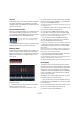
Table Of Contents
- Table of Contents
- The included effect plug-ins
- Introduction
- Delay plug-ins
- ModMachine (Cubase only)
- MonoDelay
- PingPongDelay
- StereoDelay
- Distortion plug-ins
- AmpSimulator
- DaTube
- Distortion
- SoftClipper (Cubase only)
- Dynamics plug-ins
- Compressor
- DeEsser (Cubase only)
- EnvelopeShaper (Cubase only)
- Expander (Cubase only)
- Gate
- Limiter
- Maximizer
- MIDI Gate
- MultibandCompressor (Cubase only)
- VintageCompressor (Cubase only)
- VSTDynamics
- EQ plug-ins
- GEQ-10/GEQ-30 (Cubase only)
- StudioEQ (Cubase only)
- Filter plug-ins
- DualFilter
- StepFilter
- ToneBooster
- Tonic - Analog Modeling Filter (Cubase only)
- WahWah
- Mastering - UV 22 HR
- Modulation plug-ins
- AutoPan
- Chorus
- Cloner (Cubase only)
- Flanger
- Metalizer
- Phaser
- Ringmodulator
- Rotary
- StudioChorus
- Tranceformer
- Tremolo
- Vibrato
- Other plug-ins
- Bitcrusher
- Chopper
- Octaver
- Tuner
- PitchShift - Pitch Correct
- Restoration plug-ins - Grungelizer
- Reverb plug-ins
- REVerence (Cubase only)
- RoomWorks
- RoomWorks SE
- Spatial plug-ins
- MonoToStereo
- StereoEnhancer
- Surround plug-ins (Cubase only)
- Mix6To2 (Cubase only)
- SurroundPan (Cubase only)
- Tools plug-ins
- MultiScope (Cubase only)
- SMPTEGenerator (Cubase only)
- TestGenerator (Cubase only)
- The included VST Instruments
- Introduction
- Prologue
- Sound parameters
- Modulation and controllers
- Spector (Cubase only)
- Sound parameters
- Modulation and controllers
- Mystic (Cubase only)
- Sound parameters
- Modulation and controllers
- HALionOne
- Groove Agent ONE
- LoopMash (Cubase only)
- Embracer - Surround Pad Synthesizer (Cubase only)
- Monologue - Monophonic Analog Modeling Synthesizer (Cubase only)
- Diagrams
- MIDI effects
- Index

93
MIDI effects
Beat Designer
The Beat Designer is a MIDI pattern sequencer that allows
you to create your own drum parts or “patterns” for a
project. With the Beat Designer, you can quickly and eas-
ily set up the drums for a project, by experimenting and
creating new drum sequences from scratch.
Normally, you will work on a short sequence, adjusting and
modifying it while playing it back in a loop until you get the
desired result. The drum patterns can then either be con-
verted to MIDI parts on a track or triggered using MIDI
notes during playback, see “Converting patterns into MIDI
parts” on page 97 and “Triggering patterns” on page 97.
To use the Beat Designer, select it as MIDI insert effect for
a MIDI track (routed to a VSTi or an external device) or an
instrument track.
Overview
When you open the control panel for the Beat Designer
for the first time, it shows a display with 8 empty lanes,
each containing 16 steps.
Patterns and subbanks
The Beat Designer patterns are saved as pattern banks.
One pattern bank contains 4 subbanks which in turn con-
tain 12 patterns each.
In the pattern display in the lower part of the Beat De-
signer, subbanks and patterns are displayed graphically.
To select a subbank, click on a number (1 to 4) at the top
of the display. To select a pattern within this subbank,
click on a “key” in the keyboard display below.
Initial settings
The steps represent the beat positions in the pattern. You
can specify the number of steps and the step resolution
globally for a pattern:
• Click in the “Number of steps for this pattern” value field
and enter the desired value.
The maximum number of steps is 64. By default, 16 steps are shown.
• The playback length, i.e. the note value for the steps,
can be specified in the Step resolution pop-up menu next
to the Number of Steps setting.
On this menu, you can also set triplet values. These also affect the Swing
setting, see “The Swing setting” on page 95. The default setting is 1/16.
Selecting drum sounds
To specify a drum sound, click in the drum name field for a
lane and select the desired drum sound from the pop-up
menu. The available drum sounds depend on the selected
drum map. If no drum map is selected for the track, the
GM (General MIDI) drum names are used.
• To find the right sound, you can audition the selected
drum sound by clicking the Preview Instrument button (the
speaker icon).
Step
display
Flam position
settings, see
“Adding flams”
on page 96.
Pattern display. Here the
12 patterns are displayed
for the 4 subbanks. Click
on a “key” to select a pat-
tern and on a number to
select a subbank.
Swing settings, see
“The Swing setting”
on page 95.
Swing and
Offset controls
Lane Name
fields
Jump mode
Step resolutionNumber of steps for this pattern