
Plug-in Reference
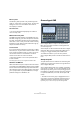


Table Of Contents
- Table of Contents
- The included effect plug-ins
- Introduction
- Delay plug-ins
- ModMachine (Cubase only)
- MonoDelay
- PingPongDelay
- StereoDelay
- Distortion plug-ins
- AmpSimulator
- DaTube
- Distortion
- SoftClipper (Cubase only)
- Dynamics plug-ins
- Compressor
- DeEsser (Cubase only)
- EnvelopeShaper (Cubase only)
- Expander (Cubase only)
- Gate
- Limiter
- Maximizer
- MIDI Gate
- MultibandCompressor (Cubase only)
- VintageCompressor (Cubase only)
- VSTDynamics
- EQ plug-ins
- GEQ-10/GEQ-30 (Cubase only)
- StudioEQ (Cubase only)
- Filter plug-ins
- DualFilter
- StepFilter
- ToneBooster
- Tonic - Analog Modeling Filter (Cubase only)
- WahWah
- Mastering - UV 22 HR
- Modulation plug-ins
- AutoPan
- Chorus
- Cloner (Cubase only)
- Flanger
- Metalizer
- Phaser
- Ringmodulator
- Rotary
- StudioChorus
- Tranceformer
- Tremolo
- Vibrato
- Other plug-ins
- Bitcrusher
- Chopper
- Octaver
- Tuner
- PitchShift - Pitch Correct
- Restoration plug-ins - Grungelizer
- Reverb plug-ins
- REVerence (Cubase only)
- RoomWorks
- RoomWorks SE
- Spatial plug-ins
- MonoToStereo
- StereoEnhancer
- Surround plug-ins (Cubase only)
- Mix6To2 (Cubase only)
- SurroundPan (Cubase only)
- Tools plug-ins
- MultiScope (Cubase only)
- SMPTEGenerator (Cubase only)
- TestGenerator (Cubase only)
- The included VST Instruments
- Introduction
- Prologue
- Sound parameters
- Modulation and controllers
- Spector (Cubase only)
- Sound parameters
- Modulation and controllers
- Mystic (Cubase only)
- Sound parameters
- Modulation and controllers
- HALionOne
- Groove Agent ONE
- LoopMash (Cubase only)
- Embracer - Surround Pad Synthesizer (Cubase only)
- Monologue - Monophonic Analog Modeling Synthesizer (Cubase only)
- Diagrams
- MIDI effects
- Index

80
The included VST Instruments
Setting the LoopMash tempo
During playback, LoopMash can be synchronized to the
tempo set in Cubase, or can follow its own tempo setting:
• Click the Sync button (to the left below the transport
controls) to activate or deactivate synchronization to the
project tempo set in Cubase.
When Sync is on, playback can be started using the Cubase transport
controls. With Sync off, LoopMash will start playing only when you click
the Play button in LoopMash.
• When the Sync button is deactivated, the current Loop-
Mash tempo (in BPM) is displayed in the tempo field be-
low the Play button.
To change the “local” tempo, click in the tempo field, enter a new value
and press [Enter].
• When the Sync button is deactivated, you can click the
Master button (to the right of the Sync button) to copy the
tempo of the current master loop into the Tempo field.
The Edit page
Click the Edit button (to the right of the transport controls)
to open the Edit page. These controls allow you to influ-
ence the way in which LoopMash plays back.
The following parameters are available:
Scenes and the Performance page
Click the Perform button (to the left of the transport con-
trols) to open the Performance page.
The settings you make on this page allow you to store
LoopMash configurations so that you can recall them later.
Below the tracks, a row of 12 pads is displayed. You can
save one “scene”, a combination of up to eight tracks with
all parameter settings, to each of these pads. This means
that you can create a LoopMash configuration with up to
96 loops – 12 scenes with eight tracks each.
The following parameters are available:
Option Description
Number of
Voices
Here you can set the total number of slices from all
tracks that will be used to replace the master slice (ac-
cording to the current similarity gain settings). The
range is from one (left) to four (right) voices, i.e. sounds
from up to four loops can play simultaneously. Increas-
ing the number of voices will increase the CPU load.
Voices per Track This is the maximum number of slices that can be se-
lected from a single track. The range is from one to four.
The less slices can be picked from the same track, the
more variety you will get in the LoopMash output.
Slice Selection
Offset
Move this slider to the right to allow slices of smaller
similarity to be selected for playback. This setting af-
fects all tracks of this scene (see below).
Random Slice
Selection
Move this slider to the right to allow more variation
when selecting slices for playback, adding a more “ran-
dom” feel to the selection process. This setting affects
all tracks of this scene (see below).
Slice Quantize Move this slider to the right to apply quantizing to the
slices, i.e. the slices are aligned to a eighth-note grid.
When the slider is all the way to the left, the slices will
follow the rhythmic pattern defined by the original mas-
ter loop.
Staccato
Amount
When you move this slider to the right, the length of the
slices is gradually reduced, giving the output a staccato
feel.
Slice
Timestretch
Use this option to apply realtime timestretching to the
slices, filling gaps or avoiding overlaps between slices
not played back at their original tempo, or when com-
bining slices with different original tempos. Applying
timestretch will increase the CPU load and may affect
the sound quality. Reduce the need for timestretching
by using loops with similar original tempos. See also
the description of the track transposition value above.
Dry/Wet Mix This sets the balance between the volumes of the mas-
ter loop and the selected slices from the other tracks.
Option Description
Scene pad 1–12 Empty scene pads are black, pads with associated
scenes are gray. The currently selected scene is white.
Click on a pad to recall the corresponding scene.
Store Scene To store a scene that you have set up, first click the
round red button (between pads 4 and 5, at the top)
and then a pad. This will save your setup to that pad.
Empty Scene To remove a scene from a pad, first click the red x but-
ton (between pads 4 and 5, at the bottom) and then the
desired pad.
Jump interval
(1/8: Now;
1/4: Next beat;
1/2: Next half
bar; 1: Next bar;
e: End)
To set behavior when changing from one scene to the
next during playback, click the button between pads 8
and 9. A pop-up menu opens, in which you can set at
which point the change to the next scene will occur.
End means that the current loop is played to the end
before switching scenes. When you set up a short loop
range (see above), you may need to set the interval to e
to ensure that the jump point is reached.
MIDI control If you have a MIDI keyboard connected to your com-
puter, you can change between scenes by pressing
keys on your keyboard. Pads 1–12 are mapped to the
C–B keys (on all octaves).
!
Once you have set up a LoopMash configuration,
you should save it to a scene pad. Changing scenes
without saving means discarding any unsaved
changes.
Option Description