
Plug-in Reference
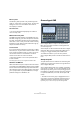


Table Of Contents
- Table of Contents
- The included effect plug-ins
- Introduction
- Delay plug-ins
- ModMachine (Cubase only)
- MonoDelay
- PingPongDelay
- StereoDelay
- Distortion plug-ins
- AmpSimulator
- DaTube
- Distortion
- SoftClipper (Cubase only)
- Dynamics plug-ins
- Compressor
- DeEsser (Cubase only)
- EnvelopeShaper (Cubase only)
- Expander (Cubase only)
- Gate
- Limiter
- Maximizer
- MIDI Gate
- MultibandCompressor (Cubase only)
- VintageCompressor (Cubase only)
- VSTDynamics
- EQ plug-ins
- GEQ-10/GEQ-30 (Cubase only)
- StudioEQ (Cubase only)
- Filter plug-ins
- DualFilter
- StepFilter
- ToneBooster
- Tonic - Analog Modeling Filter (Cubase only)
- WahWah
- Mastering - UV 22 HR
- Modulation plug-ins
- AutoPan
- Chorus
- Cloner (Cubase only)
- Flanger
- Metalizer
- Phaser
- Ringmodulator
- Rotary
- StudioChorus
- Tranceformer
- Tremolo
- Vibrato
- Other plug-ins
- Bitcrusher
- Chopper
- Octaver
- Tuner
- PitchShift - Pitch Correct
- Restoration plug-ins - Grungelizer
- Reverb plug-ins
- REVerence (Cubase only)
- RoomWorks
- RoomWorks SE
- Spatial plug-ins
- MonoToStereo
- StereoEnhancer
- Surround plug-ins (Cubase only)
- Mix6To2 (Cubase only)
- SurroundPan (Cubase only)
- Tools plug-ins
- MultiScope (Cubase only)
- SMPTEGenerator (Cubase only)
- TestGenerator (Cubase only)
- The included VST Instruments
- Introduction
- Prologue
- Sound parameters
- Modulation and controllers
- Spector (Cubase only)
- Sound parameters
- Modulation and controllers
- Mystic (Cubase only)
- Sound parameters
- Modulation and controllers
- HALionOne
- Groove Agent ONE
- LoopMash (Cubase only)
- Embracer - Surround Pad Synthesizer (Cubase only)
- Monologue - Monophonic Analog Modeling Synthesizer (Cubase only)
- Diagrams
- MIDI effects
- Index

77
The included VST Instruments
Master volume
In the Master section in the lower left of the Groove Agent
ONE panel you can find a master volume slider that sets
the output volume of the instrument.
The Exchange section
This section is used to import or export data to/from
Groove Agent ONE.
The MIDI Export pad is described in detail in the section
“Slicing a loop and triggering individual sounds via MIDI”
on page 75.
Importing MPC files
Clicking the Import button opens a file dialog in which you
can navigate to a .pgm file (.pgm is the AKAI MPC ex-
change format).
Ö Note that Groove Agent ONE will import only the map-
ping data from the .pgm file. Any additional information (on
MPC effects etc.) cannot be imported into Groove Agent
ONE.
Automation of Groove Agent ONE parameters
When opening an automation subtrack for a track that
uses Groove Agent ONE, you can select the following
plug-in parameters from the Add Parameters dialog:
•Volume
•Pan
•Mute
•Cutoff
• Resonance
These parameters are available for the pads C1 to B4.
LoopMash (Cubase only)
LoopMash is one of a kind: a powerful tool for the slicing
and instant re-assembling of any kind of rhythmic audio
material. With LoopMash, you can preserve the rhythmic
pattern of one audio loop, but you can replace all sounds
of this loop with the sounds of up to seven other loops.
LoopMash is fully integrated into Cubase, which allows
you to drag and drop audio loops from the MediaBay or
Project window directly onto the LoopMash panel.
Getting started
To give you a first impression of what you can do with
LoopMash, we have created a tutorial preset. Proceed as
follows:
1. In Cubase, create an instrument track with LoopMash
as the associated VST Instrument.
In the Inspector for the new track, click the Edit Instrument button to
open the LoopMash panel. It has two main areas: the tracks section in
the upper part of the panel, and the parameter section at the bottom.
2. At the top of the plug-in panel, click on the icon to the
right of the Preset menu field and select Load Preset from
the pop-up menu.
3. The Presets browser opens, showing presets found in
the VST 3 Presets folder for LoopMash.
4. Select the preset called “A Good Start…(Tutorial)88”.
The Presets browser is closed and the preset is loaded into LoopMash.
5. At the bottom of the panel, make sure that the Sync
button below the Transport controls is off, and start play-
back by clicking on the play button.
Release Controls the amplifier envelope release time. Reduce the
release time to shorten the decay of sounds played in
one-shot mode.
Amp Mod This parameter determines the influence that velocity has
on the pad volume setting. When set to 100%, the pad
will sound louder the higher the velocity. When set to
0%, velocity will have no effect on the pad volume.
Attack Mod This parameter determines the influence that velocity has
on the Attack setting. When set to 0%, velocity will have
no effect on the attack. When set to 100% and playing a
pad with high velocity, the Attack time is increased by
50%. The higher the Attack Mod setting, the longer the
additional attack time for a pad.
Parameter Description