
Plug-in Reference
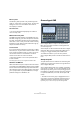


Table Of Contents
- Table of Contents
- The included effect plug-ins
- Introduction
- Delay plug-ins
- ModMachine (Cubase only)
- MonoDelay
- PingPongDelay
- StereoDelay
- Distortion plug-ins
- AmpSimulator
- DaTube
- Distortion
- SoftClipper (Cubase only)
- Dynamics plug-ins
- Compressor
- DeEsser (Cubase only)
- EnvelopeShaper (Cubase only)
- Expander (Cubase only)
- Gate
- Limiter
- Maximizer
- MIDI Gate
- MultibandCompressor (Cubase only)
- VintageCompressor (Cubase only)
- VSTDynamics
- EQ plug-ins
- GEQ-10/GEQ-30 (Cubase only)
- StudioEQ (Cubase only)
- Filter plug-ins
- DualFilter
- StepFilter
- ToneBooster
- Tonic - Analog Modeling Filter (Cubase only)
- WahWah
- Mastering - UV 22 HR
- Modulation plug-ins
- AutoPan
- Chorus
- Cloner (Cubase only)
- Flanger
- Metalizer
- Phaser
- Ringmodulator
- Rotary
- StudioChorus
- Tranceformer
- Tremolo
- Vibrato
- Other plug-ins
- Bitcrusher
- Chopper
- Octaver
- Tuner
- PitchShift - Pitch Correct
- Restoration plug-ins - Grungelizer
- Reverb plug-ins
- REVerence (Cubase only)
- RoomWorks
- RoomWorks SE
- Spatial plug-ins
- MonoToStereo
- StereoEnhancer
- Surround plug-ins (Cubase only)
- Mix6To2 (Cubase only)
- SurroundPan (Cubase only)
- Tools plug-ins
- MultiScope (Cubase only)
- SMPTEGenerator (Cubase only)
- TestGenerator (Cubase only)
- The included VST Instruments
- Introduction
- Prologue
- Sound parameters
- Modulation and controllers
- Spector (Cubase only)
- Sound parameters
- Modulation and controllers
- Mystic (Cubase only)
- Sound parameters
- Modulation and controllers
- HALionOne
- Groove Agent ONE
- LoopMash (Cubase only)
- Embracer - Surround Pad Synthesizer (Cubase only)
- Monologue - Monophonic Analog Modeling Synthesizer (Cubase only)
- Diagrams
- MIDI effects
- Index

74
The included VST Instruments
Pad functions
• The pads show the associated MIDI note in the top right
corner.
You can change the MIDI note by right-clicking it and selecting a differ-
ent note from the pop-up menu.
• You can assign up to eight samples to a pad.
See “Drag&drop of audio material” on page 74.
• If one or more samples have been assigned to a pad,
the name of the first of these samples is displayed at the
bottom of the pad.
To change the name, right-click it, enter a new name and press [Enter].
This allows you, e.g., to indicate that more than one sample is mapped to
this pad.
• To remove a sample assignment, click on the pad and
drag the associated sample(s) to the trash icon in the
LCD display to the left (see “Editing sounds” on page 75).
Note that the trash icon is found only on either the Voice, Filter or Ampli-
fier pages.
• The pad status is indicated by different colors.
During playback, a pad will light up yellow for as long as a sample
mapped to this pad is played back. When either the Voice, Filter or Am-
plifier button is activated in the Pad Edit section and you click on a pad,
it will turn green to indicate that it is selected for editing. Unselected
pads not playing back any samples are gray.
• You can mute a pad by [Shift]-clicking it.
A prohibition symbol is displayed on the muted pad. To unmute, [Shift]-
click once more.
• You can drag a sample from one pad to another pad.
If the second pad already has a sample mapped to it, the sample assign-
ment is swapped. Note that you can also swap the MIDI notes of the two
pads by pressing [Shift] when dropping the sample.
• You can drag and drop samples between groups.
Click on a pad that has a sample mapped to it, keep the mouse button
pressed and move the mouse pointer over the button of another group.
When the pad display now changes to display the pads of the other
group, drag and drop the sample on the desired pad.
Velocity
• The velocity is determined by where on the pad you
click: velocity is lowest at the bottom of the pad and high-
est at the top.
• You can force all pads to a velocity value of 127 by ac-
tivating the V-Max button in the Global section in the top
right corner of the Groove Agent ONE panel.
Resetting pads
You will find a Reset button in the Global section in the
top right corner of the Groove Agent ONE panel. It allows
you to clear all pad assignments of the current instance of
Groove Agent ONE.
As a safety precaution, the Reset button is locked by de-
fault. Clicking the Reset button when it is locked will have
no effect.
To unlock the Reset button, hold down the [Shift] key
while clicking. The button color changes to red. When you
click Reset now, all pad assignments are reset.
Drag&drop of audio material
Groove Agent ONE provides advanced drag&drop sup-
port. You can drag one or more samples at the same time
from Cubase onto Groove Agent ONE. Samples will ei-
ther be mapped to the same pad, or to different pads.
You can drag files to Groove Agent ONE from the follow-
ing Cubase locations:
•MediaBay
• Sample Editor (regions)
• Audio Part Editor
Layering samples on the same pad
When you select between one and eight samples and
drag them to Groove Agent ONE, dropping them onto a
pad (or onto the Layer indicator – see below) will automat-
ically create a corresponding number of layers for this
pad.
Drag&drop to several pads
Rather than dropping several samples to the same pad,
you can also let Groove Agent ONE distribute samples
across the available pads in one or several groups. To do
so, press [Shift] and drop the samples onto a pad. The
samples are mapped to the available pads, starting with
the pad on which you initially dropped the samples, and
then upwards according to the pad’s MIDI pitch.
!
The Reset button is re-locked automatically five sec-
onds after unlocking it.