
Plug-in Reference

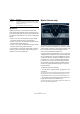


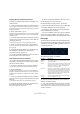
Table Of Contents
- Table of Contents
- The included effect plug-ins
- Introduction
- Delay plug-ins
- ModMachine (Cubase only)
- MonoDelay
- PingPongDelay
- StereoDelay
- Distortion plug-ins
- AmpSimulator
- DaTube
- Distortion
- SoftClipper (Cubase only)
- Dynamics plug-ins
- Compressor
- DeEsser (Cubase only)
- EnvelopeShaper (Cubase only)
- Expander (Cubase only)
- Gate
- Limiter
- Maximizer
- MIDI Gate
- MultibandCompressor (Cubase only)
- VintageCompressor (Cubase only)
- VSTDynamics
- EQ plug-ins
- GEQ-10/GEQ-30 (Cubase only)
- StudioEQ (Cubase only)
- Filter plug-ins
- DualFilter
- StepFilter
- ToneBooster
- Tonic - Analog Modeling Filter (Cubase only)
- WahWah
- Mastering - UV 22 HR
- Modulation plug-ins
- AutoPan
- Chorus
- Cloner (Cubase only)
- Flanger
- Metalizer
- Phaser
- Ringmodulator
- Rotary
- StudioChorus
- Tranceformer
- Tremolo
- Vibrato
- Other plug-ins
- Bitcrusher
- Chopper
- Octaver
- Tuner
- PitchShift - Pitch Correct
- Restoration plug-ins - Grungelizer
- Reverb plug-ins
- REVerence (Cubase only)
- RoomWorks
- RoomWorks SE
- Spatial plug-ins
- MonoToStereo
- StereoEnhancer
- Surround plug-ins (Cubase only)
- Mix6To2 (Cubase only)
- SurroundPan (Cubase only)
- Tools plug-ins
- MultiScope (Cubase only)
- SMPTEGenerator (Cubase only)
- TestGenerator (Cubase only)
- The included VST Instruments
- Introduction
- Prologue
- Sound parameters
- Modulation and controllers
- Spector (Cubase only)
- Sound parameters
- Modulation and controllers
- Mystic (Cubase only)
- Sound parameters
- Modulation and controllers
- HALionOne
- Groove Agent ONE
- LoopMash (Cubase only)
- Embracer - Surround Pad Synthesizer (Cubase only)
- Monologue - Monophonic Analog Modeling Synthesizer (Cubase only)
- Diagrams
- MIDI effects
- Index

70
The included VST Instruments
Assigning Envelope modulation destinations
To assign a modulation destination for an Envelope, pro-
ceed as follows:
1. Click in the “Mod Dest” box for one of the Envelopes.
A pop-up appears with all possible modulation destinations are shown.
All Sound parameters as well as most LFO and Envelope parameters are
available as destinations.
2. Select a destination, e.g. Cut.
The selected modulation destination is now shown in the list. Beside the
destination, a default value (50) has been set. The value represents the
modulation amount.
• You can set positive and negative modulation values by
clicking on the value in the list, typing in a new value and
pressing the Enter key.
To enter negative values type a minus sign followed by the value.
3. Select a suitable envelope curve for the modulation.
You should now hear the Cut parameter being modulated by the enve-
lope as you play.
4. Using the same basic method, you can add any num-
ber of modulation destinations for the envelope.
They will all be listed in the “Mod Dest” box.
• To remove a modulation destination click on its name in
the list and select “Off” from the pop-up.
Assigning Envelope velocity destinations
You can also assign Envelope modulation that is velocity
controlled (i.e. governed by how hard or soft you strike a
key). This is done as follows:
1. Click in the “Vel Dest” box for one of the envelopes.
A pop-up appears with all possible velocity destinations are shown.
2. Select a destination.
The selected velocity destination is now shown in the list. Beside the
destination, a default value (50) has been set. The value represents the
modulation amount. See below for an example of how velocity modula-
tion works.
• You can set positive and negative values by clicking on
the value in the list, typing in a new value and pressing the
Enter key.
To enter negative values type a minus sign followed by the value.
3. Using the same basic method, you can add any num-
ber of velocity destinations for the Envelope.
They will all be listed in the “Vel Dest” box.
• To remove a modulation destination click on its name in
the list and select “Off” from the pop-up.
Envelope modulation velocity control – an example:
If you follow the steps above and select the Cut parameter
as a Velocity destination, the following happens:
• The harder you strike the key, the more the parameter
will be modulated by the Envelope.
• If you enter a negative value for the velocity modulation
amount, the opposite happens; the harder you play the
less the Cut parameter will be modulated by the Envelope.
Event page
The Event page is opened by clicking the EVENT button
at the top of the lower half of the control panel. This page
contains the most common MIDI controllers and their re-
spective assignments.
The Event page
The following controllers are available:
To assign any of these controllers to one or several pa-
rameters, proceed as follows:
1. Click in the “Mod Dest” box for one of the controllers.
A pop-up appears with all possible modulation destinations are shown.
All Sound parameters as well as most LFO and Envelope parameters are
available as destinations.
Controller Description
Modulation
Wheel
The modulation wheel on your keyboard can be used to
modulate parameters.
Velocity Velocity is used to control parameters according to how
hard or soft you play notes on your keyboard. A common
application of velocity is to make sounds brighter and
louder if you strike the key harder.
Aftertouch Aftertouch, or channel pressure, is MIDI data sent when
pressure is applied to a keyboard after the key has been
struck, and while it is being held down or sustained. Af-
tertouch is often routed to control filter cutoff, volume,
and other parameters to add expression. Most (but not
all) MIDI keyboards send Aftertouch.
Key Pitch
Tracking
This can change parameter values linearly according to
where on the keyboard you play.