
Plug-in Reference

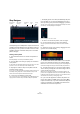
Table Of Contents
- Table of Contents
- The included effect plug-ins
- Introduction
- Delay plug-ins
- ModMachine (Cubase only)
- MonoDelay
- PingPongDelay
- StereoDelay
- Distortion plug-ins
- AmpSimulator
- DaTube
- Distortion
- SoftClipper (Cubase only)
- Dynamics plug-ins
- Compressor
- DeEsser (Cubase only)
- EnvelopeShaper (Cubase only)
- Expander (Cubase only)
- Gate
- Limiter
- Maximizer
- MIDI Gate
- MultibandCompressor (Cubase only)
- VintageCompressor (Cubase only)
- VSTDynamics
- EQ plug-ins
- GEQ-10/GEQ-30 (Cubase only)
- StudioEQ (Cubase only)
- Filter plug-ins
- DualFilter
- StepFilter
- ToneBooster
- Tonic - Analog Modeling Filter (Cubase only)
- WahWah
- Mastering - UV 22 HR
- Modulation plug-ins
- AutoPan
- Chorus
- Cloner (Cubase only)
- Flanger
- Metalizer
- Phaser
- Ringmodulator
- Rotary
- StudioChorus
- Tranceformer
- Tremolo
- Vibrato
- Other plug-ins
- Bitcrusher
- Chopper
- Octaver
- Tuner
- PitchShift - Pitch Correct
- Restoration plug-ins - Grungelizer
- Reverb plug-ins
- REVerence (Cubase only)
- RoomWorks
- RoomWorks SE
- Spatial plug-ins
- MonoToStereo
- StereoEnhancer
- Surround plug-ins (Cubase only)
- Mix6To2 (Cubase only)
- SurroundPan (Cubase only)
- Tools plug-ins
- MultiScope (Cubase only)
- SMPTEGenerator (Cubase only)
- TestGenerator (Cubase only)
- The included VST Instruments
- Introduction
- Prologue
- Sound parameters
- Modulation and controllers
- Spector (Cubase only)
- Sound parameters
- Modulation and controllers
- Mystic (Cubase only)
- Sound parameters
- Modulation and controllers
- HALionOne
- Groove Agent ONE
- LoopMash (Cubase only)
- Embracer - Surround Pad Synthesizer (Cubase only)
- Monologue - Monophonic Analog Modeling Synthesizer (Cubase only)
- Diagrams
- MIDI effects
- Index

108
MIDI effects
Step Designer
The Step Designer is a MIDI pattern sequencer that sends
out MIDI notes and additional controller data according to
the pattern you set up. It does not make use of the incom-
ing MIDI, other than automation data (such as recorded
pattern changes).
Creating a basic pattern
1. Use the Pattern selector to choose which pattern to
create.
Each Step Designer can hold up to 200 different patterns.
2. Use the “Step size” setting to specify the “resolution”
of the pattern.
In other words, this setting determines how long each step is. For exam-
ple, if this is set to “1/16” each step will be a sixteenth note.
3. Specify the number of steps in the pattern with the
“Number of steps” setting.
As you can see in the note display, the maximum number of steps is 32.
For example, setting “Step size” to 16 and “Number of steps” to 32
would create a two bar pattern with sixteenth note steps.
4. Click in the note display to insert notes.
You can insert notes on any of the 32 steps, but the Step Designer will
only play back the number of steps set with the Step size parameter.
• The display spans one octave (as indicated by the pitch
list to the left). You can scroll the displayed octave up or
down by clicking in the pitch list and dragging up or down.
This way you can insert notes at any pitch. Note that each step can contain
one note only – the Step Designer is monophonic.
Click and drag to view other octaves.
• To remove a note from the pattern, click on it again.
5. On the Controller pop-up menu, select Velocity.
This pop-up menu determines what is shown in the lower controller
display.
6. Adjust the velocity of the notes by dragging the veloc-
ity bars in the controller display.
7. To make notes shorter, select “Gate” on the Controller
pop-up menu and lower the bars in the controller display.
When a bar is set to its maximum value (fully up), the corresponding note
will be the full length of the step (as set with the Step size parameter).
8. To make notes longer, you can tie two notes together.
This is done by inserting two notes and clicking in the Tie
column for the second note.
When two notes are tied, the second note will not be triggered – the
previous note is lengthened instead. Also, the tied (second) note will au-
tomatically get the same pitch as the first note. You can add more notes
and tie them in the same way, creating longer notes.
9. If you now start playback in Cubase, the pattern will
play as well, sending out MIDI notes on the track’s MIDI
output and channel (or, if you have activated the Step De-
signer as a send effect, on the MIDI output and channel
selected for the send in the Inspector).
Number of
steps
SwingStep
size
Pattern selector
Controller pop-up menu
Shift octave
up/down
Shift steps
left/right