
New Features in Cubase 4.5


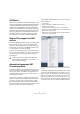
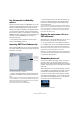
Table Of Contents
- Table of Contents
- Introduction
- Working with the new features
- VST Sound
- Plug and Play support for ASIO devices
- Automatically generated VST Connection presets
- Monitoring improvements (Cubase only)
- Mac OS X improvements
- Remote Devices
- Key Commands for MediaBay options
- Importing OMF files (Cubase only)
- Routing the metronome click to a VST Instrument
- Suspending Autoscroll
- New option in the Project Synchronization Setup dialog
- Index

10
Working with the new features
Key Commands for MediaBay
options
Several commands relating to the MediaBay can now be
performed using keyboard shortcuts. These are set up in
the Key Commands dialog (opened via the File menu).
New key commands are available for the following actions:
you can step through presets, open the Presets browser,
and use the arrow keys on your keyboard to navigate in the
MediaBay windows. Furthermore, you can reset the search
criteria or revert to the MediaBay as it was when you
launched the program.
Ö Note that this makes it possible to remote control
several of the MediaBay functions.
Importing OMF files (Cubase only)
When importing OMF files, you can now choose between
two options specifying at which time position the files will
be placed in the project.
The Import options dialog for an OMF file
• “Import at Timecode Position” will insert the elements
contained in the OMF file at their original timecode posi-
tions.
This is useful when you want to position every imported element at its ex-
act timecode position, i.e. as it was saved in the OMF file. This way, the
elements will end up at their correct time positions even when Cubase
uses a different frame rate than the OMF file.
This is usually required in a picture-related context.
• “Import at Absolute Time” will insert the elements con-
tained in the OMF file starting at the timecode position
saved in the file and keeping the relative distances be-
tween the elements.
This is required when the relative positioning of the elements inside the
OMF file needs to be maintained after importing it into the Cubase time-
line (even if Cubase is set to a different frame rate than the OMF file).
This is usually required in musical environments, where the timing be-
tween objects has highest priority.
Routing the metronome click to a
VST Instrument
When setting up a metronome MIDI click, you can use a
VST Instrument to provide the sound for the click.
1. On the Transport menu, select “Metronome Setup…”.
2. In the MIDI Click section, open the MIDI Port/Channel
pop-up menu and select a VST Instrument from the list.
Note that the instrument must have been set up in the VST Instruments
window. Make sure that Activate MIDI Click is activated.
When you now start playback and a sound is selected in
your VST Instrument, the metronome click will be heard
using the VSTi selected above.
Suspending Autoscroll
On the main toolbar in the Project window, as well as in
the various editors, you will find the Autoscroll button.
When this button is activated, the display will scroll during
playback, keeping the project cursor visible in the window
at all times.
When editing parts or events during playback with Auto-
scroll enabled, you may suddenly “loose sight” of the ed-
ited material as the display follows the project cursor.
If you don’t want the Project window display to change
when editing during playback, you can activate the “Sus-
pend Autoscroll when Editing” button. You will find this
button right next to the Autoscroll button.
Suspend Autoscroll when Editing
Options for
positioning
the data on
the timeline