Professional Fabric Steamer Owner’s Guide MODEL SF-565 ENGLISH p.
IMPORTANT SAFETY INSTRUCTIONS This owner's guide and any additional inserts are considered part of the product. They contain important information about safety, use, and disposal. Before using the product, please familiarize yourself with all operating and safety instructions. Please keep all documents for future reference and pass these documents on, together with the product, to any future owner. See our website for the most current version of this owner’s guide.
12. If an extension cord is absolutely necessary, a 15 amp rated cord should be used. Cords rated for less amperage may overheat. Care should be taken to arrange the cord so that the cord cannot be pulled or tripped over. WARNING: Changes or modifications to this unit not expressly approved by the party responsible for compliance could void the user’s authority to operate the equipment.
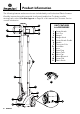
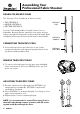
Product Information The following features and accessories are included with your Professional Fabric Steamer. Carefully inspect the packing material for all parts listed below. To obtain possible missing parts, refer to Product Support on Page 14 of this manual for Consumer Service contact information.
• The Steam Nozzle (1) emits the flow of hot, penetrating steam produced by the Boiler. The Fabric Brush connects to the Steam Nozzle. • The Pole Top (2) connects to the top section of the Telescopic Pole. The Pole Top is comprised of the Steam Nozzle Cradle and Hanger Hook. • The Hanger (3) connects to the Pole Top, and is designed to support garments for easy, accessible steaming. The Hanger quickly collapses for convenient storage. • The Hanger Hook (3a) supports the included Hanger.
Assembling Your Professional Fabric Steamer DOUBLE TELESCOPIC POLES The Telescopic Pole is made up of three sections: • TOP (SECTION 1) • MIDDLE (SECTION 2) • BOTTOM (SECTION 3) Sections 1 & 2 are adjustable in length. Section 3 is not adjustable. By using the two extension locks, these sections may be extended or retracted to achieve desired length. Refer to Adjusting Telescopic Poles section below for more details. SECTION 1 (TOP) SECTION 2 (MIDDLE) CONNECTING TELESCOPIC POLE 1.
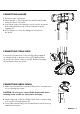
CONNECTING HANGER 1. Release hinges on Hanger. 2. Align Hanger to Telescoping Poles with Nozzle Cradle facing the front of the unit. 3. Insert both ends of the Hanger onto the poles and press both ends simultaneously until the Hanger properly engages (C). 4. Close hinges to secure the Hanger is locked onto the poles. CONNECTING STEAM HOSE C D Connect the Steam Hose to the unit by pulling upward on clamping ring on bottom of hose (D). While pulling up, push onto steam outlet on unit (E).
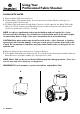
Using Your Professional Fabric Steamer FILLING WITH WATER 1. Remove Water Tank from main unit. 2. Holding Water Tank upside-down, unscrew and remove Valve Cap by rotating it in a counterclockwise direction (G). 3. Fill Water Tank with water through Valve Cap hole. At full capacity, the Water Tank holds 106 oz (3,135 ml) of water, and depending on the steam setting selected, will provide a continuous steam time of 95 min. on High.
GENERAL OPERATION NOTE: Be sure that Water Tank has been filled and, if desired, the Fabric Brush is connected before following these steps. 1. For first-time use, remove protective plastic cover that is shipped on electrical plug. Plug power cord into a convenient electrical outlet. 2. Turn Steam Dial to desired steam level. Blue power indicator light will illuminate around Steam Dial (I). I 3. After approximately 45 seconds of heating time, unit will begin producing a flow of steam from Steam Nozzle.
FABRIC STEAMING STEAMING GARMENTS: 1. To extend Hanger, pull on each side to full extension. A garment may now be placed on the Hanger. 2. Alternatively, place garment on a clean, rust-free clothes hanger. Place hanger (with garment) on either hanger hook. CAUTION: Use care when handling garments hanging on unit. Pulling on the garment with too much force may cause the unit to tip over. 3. Direct Steam Nozzle towards bottom of garment. Steam will rise along inside and outside of fabric, removing wrinkles.
Storage & Care PROPER STORAGE Preparing your Professional Fabric Steamer for storage is quick and simple. When you have finished your steaming tasks, follow the steps listed below. 1. Turn Steam Dial to Off position, and unplug power cord from electrical outlet. 2. Allow unit to cool (30 minutes for complete cooling). 3. Bring unit to convenient sink or tub. 4. Remove Water Tank from unit. Unscrew Valve Cap and drain all remaining water from Water Tank. Replace Valve Cap when finished. 5.
MINERAL BUILD-UP A common maintenance need for steam appliances is the removal of build-up caused by high mineral content in many municipal water supplies. This mineral build-up may limit the effectiveness and reduce the life of your Professional Fabric Steamer. The best way to minimize mineral build-up is to use distilled or de-mineralized water when using your Professional Fabric Steamer.
Troubleshooting PROBLEM Unit fails to heat up. When turned, Steam Dial DOES NOT illuminate when set to “ON” position. Unit fails to heat up. When turned, Steam Dial DOES illuminate when set to “ON” position. NOTE: Always allow sufficient time for unit to heat up and begin producing steam. Excessive gurgling in Hose and Steam Nozzle / water drips from Steam Nozzle. Steam output is weak or intermittent. POSSIBLE CAUSE SOLUTION Unit is not plugged in. Plug power cord into electrical outlet.
Product Support ACCESSORIES & PARTS When ordering replacement parts and accessories for your Professional Fabric Steamer, you may refer to the part numbers below. Parts and accessories may be ordered through our Website: www.steamfast.com You may also contact Consumer Service directly: consumerservice@steamfast.
Warranty Information 1-YEAR LIMITED WARRANTY What is covered Steamfast, a division of Vornado Air, LLC (“Steamfast”).
Steamfast 415 East 13th, Andover, KS 67002 1-800-711-6617 steamfast.com consumerservice@steamfast.