Stealth Cam STC-CRV20 User’s Manual Toll Free Customer Support 1-877-269-8490 www.stealthcam.net Version 1.
STC-CRV20 For Customer Service or Warranty Information Call Toll Free 877-269-8490 Stealth Cam, LLC P.O. Box 539504 Grand Prairie, TX 75053-9504 www.stealthcam.net Stealth Cam Limited Warranty Your Stealth Cam scouting camera is covered by a 90 day Limited Warranty on parts and labor from the date of original purchase, and purchases must be made through an authorized dealer. The warranty covers defects in workmanship and materials.
STC-CRV20 Manual Contents Warranty 2 Picture Viewer Overview 4 Picture Viewer Contents 5 Battery Installation 6 Memory Card Compatibility 8 Features 9 Operations 10 Information Display 17 Use as Memory Card Reader 18 Specifications 21 General Information 22 www.stealthcam.
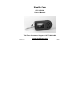
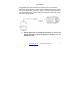
STC-CRV20 Picture Player Overview 4 www.stealthcam.
STC-CRV20 Picture Player Contents • Model STC-CRV20 Picture Viewer • CDROM (Contains camera driver for Win 98 and Win 98SE operating system) • User Manual • USB cable • Barrel Plug Converter Cable • Carry Strap www.stealthcam.
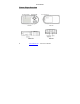
STC-CRV20 Battery Installation Warning: Do not use different Voltage lead acid battery other than the one specified in this section. Doing so will damage the unit and will void the warranty. The Stealth Cam STC-CRV20 picture viewer is designed to operate using two different types of battery power options. Batteries “AAA” cell The internal battery compartment accepts 4 “AAA” cell batteries. Be sure to use high quality brand name alkaline batteries.
STC-CRV20 Only Stealth Cam external battery accessories are recommended Attach the barrel plug from the 6V Lead Acid Battery kit to the receiving end of the Barrel Plug Converter Cable. Insert the small barrel plug from the Barrel Plug Converter Cable to the external power jack on the side of the picture viewer. Please make sure the voltage and polarity (+/-) are correct before connection. Incorrect voltage or polarity (+/-) will damage the unit. www.stealthcam.
STC-CRV20 Memory Card Compatibility The STC-CRV20 picture viewer is designed to accept SD memory card that was used in storing images from any of the Stealth Cam and Wildview digital camera models. Except from models with Audio. Please note: Do not alter the file name that is used in storing the image capture by your Stealth Cam or Wildview Digital camera. Leave it in its original file name format and folder.
STC-CRV20 Features • Zoom: Magnify the image up to 4 times its normal size. • Memory Card: If you have 2 SD card insert in the viewer at the same time, you can choose which card you want to view the image. • Delete One: To delete one image at a time in the memory card. • Delete All: To delete all image in the memory card. • Format: To format your memory card. • Copy and move: To copy or move from SD card A to SD card B. Please note this is a one way copy or move from A to B. www.stealthcam.
STC-CRV20 Operations 10 • Power On/Off: Push and hold the Power/Mode button for approximately 5 seconds or until you see the Stealthcam logo on the screen to power on the unit. To turn the unit off, push and hold the button for approximately 2 seconds or until the screen is turned off. • If you are only using 1 SD card, the viewer will display the image stored in this card in sequence.
STC-CRV20 Push the button again for zoom in x4, and push the button 4 times to return to normal view x1 zoom. • Panning: While the image is in zoom mode, you can pan the image by using the UP/DOWN/LEFT/RIGHT arrow buttons. • To exit from the panning mode: Push the zoom button until it is back to normal display which shows x1 on the top information display bar. • To play AVI clip: If the file is an AVI clip, the screen will show “Press ZOOM To Play AVI”.
STC-CRV20 12 o Delete All: To delete all image in the memory card. Choose Yes or No by using the UP/DOWN arrow and confirm your selection by pressing Right Arrow once. o Format: To format your memory card. Choose Yes or No by using the UP/DOWN arrow and confirm your selection by pressing Right Arrow once. o Copy: To copy from SD card A to SD card B. You can choose to copy one file at a time or all files at the same time.
STC-CRV20 Maximum Image file number display limitation: If there are more than 998 files saved in the SD card, the maximum playback quantity number on the information bar will only show the first 998 files, in file number sequence, regardless of still image or AVI file. This applies to each card slot. Do not be alarmed. The remaining files still exist in the SD card. Remember: Only the first 998 files, in file number sequence, can be viewed on the viewer.
STC-CRV20 automatically power off when SD card B reaches its maximum memory capacity. 2. If SD card B has enough memory capacity to hold the files copied or cut from card A: • Copy all (for less than 998 image files) - you may copy the entire content at one time to card B. • Copy all (for more than 998 image files) – We do not recommend using this function if you have more than 998 images in card A. The viewer will randomly select the first 998 files to be copied from Card A to Card B.
STC-CRV20 the same files to cut. After no more image files exists in Card A, the viewer screen will show “No Image.” 4. When using Cut, the LCD screen will show "Moving…... " Playback on Viewer: 1. AVI files captured by newer Stealthcam and Wildview series with date/time stamp on the last frame: it will not be able to show the last frame so you will not be able to see the actual date/time stamp on the viewer. 2.
STC-CRV20 • 16 If there are more than 998 image files inside the SD card, the information bar displays the maximum number of 998 files, so only the images you see on the viewer may be deleted all or one at a time while the remaining files exist in the SD card. The information bar will update the total image count deleted only after re-powering the unit. www.stealthcam.
STC-CRV20 Information Display • Top Information Bar: o Shows current image number vs. total number of images in the memory card. o Memory card slot in use o Zoom value o Battery Status Full • Half Low: Unit will power off after 10 seconds Bottom information bar: Will display image file name. File name format will vary. www.stealthcam.
STC-CRV20 Use as Memory Card Reader For Windows XP, 2000, ME user This picture viewer is a plug and play unit and can be used as memory card reader when you connect the picture viewer to a computer via USB cable. Warning: Do not connect the USB cable to the viewer when the display screen shows “Busy…. Please Wait !”. Doing so may cause detection error while the unit is scanning the image data. USB connection procedure: 18 • Power on the unit.
STC-CRV20 • Viewer’s display will show “ USB Mode” to indicate that the USB cable is connected to the computer. • User can now download, or delete image of selected memory card form the PC. For Windows 98 or Windows 98SE user The CD-ROM packaged with the picture viewer contains the driver for Win 98 and Win 98SE user. This CD-ROM is designed for PC’s only (not MAC compatible). Playing this CD-ROM on a stereo or CD player may cause damage to it.
STC-CRV20 • Follow the instructions shown on screen from your PC to completely install the driver and application program. • Unplug the USB Cable and restart windows. • If your computer doesn’t run automatically, please click “Start” button and choose “Run”, and then browse the CD drive and click “Setup”. Once driver is installed, follow USB connection procedure on page 15.
STC-CRV20 Specification • Built in 2.0” Color LCD display. • Memory support: Maximum file size of still image supported: 5MB pixel. Maximum file size of AVI clip supported: 1.8MB Warning: If you have image with file size larger than 5MB, or AVI file size larger than 1.8MB, it may or may not display properly. AVI file that contain audio may produce noise interference during playback. • Power: AAA size alkaline Batteries x 4 • External power: 6 volts SLA battery pack.
STC-CRV20 General Information Storing conditions • Store in cool and dry location when it’s not in use. Operating Environment: 14 to 104 deg F (-10 to 40 deg C). 2085% relative humidity, non-condensing. Special care instructions!! • • Never attempt to immerse the unit into water or any other liquid. This will damage the unit and void the warranty. • Use a soft lens cloth for cleaning the LCD screen. • Remove dirt or stains with a soft cloth dampened with water or neutral detergent.