
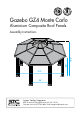
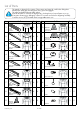
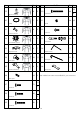
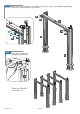
Replacement Part List

of 243
www.stcny.com
Safety Advice
•
The gazebo must be positioned and fixed
on a flat level surface.
•
Dispose of all plastic bags safely. Keep
them out of the reach of children.
•
Keep children and pets away from the
assembly area until the work is completed.
•
Always wear shoes, gloves and safety
goggles when working.
•
Take special care not to touch overhead
power lines with the aluminium profiles.
•
Do not attempt to assemble the gazebo in
windy or wet conditions.
•
Do not position your gazebo in an area
exposed to excessive wind.
•
If using power tools or a ladder, always fol-
low the manufacturers safety instructions.
•
Hot items such as recently used grills,
blowtorches etc. must not be stored in the
gazebo.
•
Make sure the gazebo complies with local
building codes.
1
1
2
3
6
8
9
ATTENTION:
DO NOT ATTEMPT TO
ASSEMBLE THE GAZEBO
ALONE!
Table of Contents
Introduction................................................. 2
Table of Contents......................................... 3
List of Parts.................................................. 4
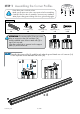
Step 1 Assembling the Corner Profiles................. 6
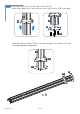
Step 2 Attaching the Rails to the Corner Profiles... 8
Step 3 Securing the Gazebo to the ground......... 11
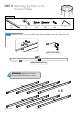
Step 4
Installing the Lower Roof gable Profiles
.. 12
Step 5
Assembling the Roof Top..............................
13
Step 6
Connecting the Roof Top to the Roof
Gable Profiles.................................... 17
Step 7 Connecting the Horizontal Roof Profiles... 18
Step 8
Installing the Roof Panels and
Upper Roof Profiles.............................. 19
Step 9
Installing the Plastic Caps......................... 23
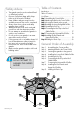
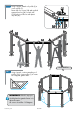
General Order of Assembly
Step 1: Assembling the Corner profiles
Step 2:
Attaching the Rails to the Corner Profiles
Step 3: Securing the gazebo to the ground
Step 4: Installing the Lower Roof Gable Profiles
Step 5:
Assembling the Roof Top
Step 6: Connecting the Roof Top to the Roof
Gable Profiles
Step 7
Connecting the Horizontal Roof Profiles
Step 8: Installing the Roof Panels and
Upper Roof Profiles
Step 9:
Installing the Plastic Caps
4
5
7