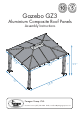
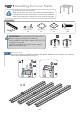
Gazebo GZ3 Aluminium Composite Roof Panels Assembly Instructions 10 ’8 ’’ ’’ 1 13’ 10 ’ 7’ ’’ 5 12’ Paragon Group USA Customer Service:(877) 782 4482 Email:cs-outdoors@paragongroupusa.
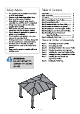
Introduction Thank you for purchasing the Gazebo GZ3. When properly assembled and maintained, this gazebo will provide many years of enjoyment! These instructions include helpful hints and important information needed to safely assemble and properly maintain the gazebo. Please read these instructions completely before you begin. Our patented gazebo has been designed for easy assembly. All steps can be completed by a team of four people. The assembly should take about two hours.
of 24
four contact customer service before bedinning assembly: Customer Service:(877) 782 4482 Email:cs-outdoors@paragongroupusa.
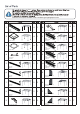
19 2 8 5 52 7 6 5 14 7 10 5 36 32 3 37 10 8 38 4 8 39 16 4 40 16 4 41 1 42 1 2 5 4 5 31 7 M6*33mm Aluminium Composite Roof Panel 32 2 20 M6*38mm 5 33 Top center connector M6*45mm 1 21 5 34 Φ4*8mm Roof Top Cover 1 22 35 5 M6 Roof Top Connector Beam 2 23 5 U-shaped Connector 2 24 6 1052mm 25 2 6 2 6 886mm 26 886mm 27 4 6 28 20 2,5 136 2,3 5,6 43 24 1 44 M6*8mm 29 M6*18mm 30 T - connector X - connector M6*25mm 5 of 24
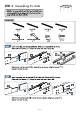
STEP 1 Assembling the Corner Profiles Place all the parts on a level surface. Make sure the pieces are in the correct positions before assembling. Carefully follow the order of assembly to ensure an easy installation. Wear proper safety gear including work shoes, gloves and goggles.
1.B Slide support frames (2) over lower end of corner profiles (1). Attach support plates (3) to corner profiles as shown, using four tapping screws (30) for each plate, make sure all tappnig screws are perpendicularly into the proflie holes.
10 29 28 14 48 28 29 28 29 28 28 29 29 8 of 24
29 29 29 29 29 9 of 24
29 42 29 32 29 29 29 36 36 36 10 of 24 32 36 42
42 29 36 29 36 11 of 24
STEP 4 Securing the Gazebo to the Ground 4.A Fasten the gazebo frame to the ground, using four spikes (39) for each support plate. Lower suppo rt frames (2) to cover suppo rt plates (3). Components 1 2 Ground spike (39) 1 x 16 39 3 3 Optional Securing the Gazebo to a Concrete Floor or Wood Deck Concrete Floor: Components 1. Using a concrete drill, drill holes into the concrete floor, corresponding to the holes in support plates (3). 2.
Roof Gable Profile(11) 2346mm Roof Gable Profile(12) 1696mm Roof Gable Profile(13) 1164mm Roof Gable Profile(14) 1164mm x 4 x 2 x 4 x 4 T-connector A(43) x 2 Screw(28) x 4 Roof Top Connector Beam(22) x 1 Roof Top Cover(21) x 1 Top center connector(20) x 2 Screw(31) Screw(29) x 4 x 2 Nut M6(35) Screw(33) x 8 x 36 U-shaped X-connector (44) Connector(23) x 10 x 6 11 , 12 , 13 , 14 3. 1. 2. 3. 1.
31 35 29 35 11 31 22 11 11 11 29 Install roof gable profiles (12). Using screws (33) nuts (35) connect top center connector (20) to top connector beam(22). Using screws (29)connect profiles (12) to inner roof connector (9) on long roof profiles sets (5,6) and the other end to roof top center connector(20).
28 28 28 28 33 33 33 Attach T-connectors (43) to underside of roof gable profiles (12) , using screws (29) as shown. Attach X-connectors (44) to underside of roof gable profiles (11) , using screws (29) as shown. Connect profile (13,14) to X-connector (44) and the other end to T-connector(9) using screws(29).
Corner cap(27) x 4 29 20 Attach roof goble profiles (24,25,26) to T-connectors(43) and X-connector (44) , plancing ends into cut-outs on gutter profiles 11,12 as shown. 11 11 25/24 24/26 44 11 29 12 26 25 11 24 25 24 11 26 43 12 1 11 29 12 29 1 29 27 11 29 Attach corner cap(27) to the top of the posts from inside, and using screws(29).
Gently cut on the edge of the panels on both side with knife and remove protective plastic of roof panels. Place with black surface toward the sun facing out when installing. black side black side Aluminium Composite Roof Panel(15) Aluminium Composite Roof Panel(16) x 2 x 2 black side black side Aluminium Composite Roof Panel(17) Aluminium Composite Roof Panel(18) x 4 x 4 Aluminium Composite Roof Panel(19) Screw(34) x 14 x 2 Fit roof panel (15) on top of roof profiles (12 and 13).
34 14 16 16 12 14 13 15 34 11 13 14 11 12 14 13 14 13 16 14 16 12 34 11 18 of 24 14 13 11
Roof Gable Profile Roof Gable Profile Roof Gable Profile Roof Gable Profile (11A) (12A) (13A) (14A) x 4 x 2 12 Screw(32) x 52 x 4 x 4 12 32 12A 26 25 16 15 12 32 12A 12 14 19 of 24 13
14 26 18 11 24 18 14 11 13 18 34 14 14 roof 18 14 34 11 13 14 11 12 14 13 13 14 12 11 14 13 20 of 24 11
14A 14 32 14A 14 11 Fit roof panel(19) on top of roof profiles(13,14) and fasten with one screws (34) outer roof connector(10). Place profiles(11A) on top of roof profile (11) ; fasten ONLY THE TOP END with 1 screw(32). Fit roof panel(17) on top profiles(11,13) , fasten with one screw(34) outer roof connector(10), and then fasten(11A) with screw(32).
Continue in a clock-wise direction as shown. 11A 13A 17 12A 15 14A 16 11A 18 17 18 14A 13A 19 19 13A 18 17 18 11A 14A 15 16 14A 12A Place the roof panel (18,19) on top of profiles (11,13,14) , fasten with screw (34) from below. Place the roof gable profile 11A on top of 11 , fasten with screw(32) from below of 11.
Place the roof gable profile (13A) on top of (13) , fasten with screw (32) from below of 13.
Gazebo GZ3 Aluminium Composite Roof Panels Assembly Instructions WARRANTY: Warranty covers damage due to manufacturing defects only. Warranty does not cover weather inflicted damage (Force Majeure) and/or damages caused by not following assembly instructions and adhering to warnings in manual. ATTENTION: Roof profiles,roof planels and gables must be aligned properly during assembly to minimize any possibility of leaking.