
Instruction Manual


Pg. 6
SM-PROJ-XL Installation Manual
© 2013 Strong
®
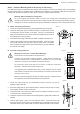
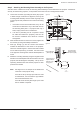
A. Ifnoadaptersoraccessoriesarebeingused, thread theprojector
mountbody(B)intotheceilingplate(A)byhandastightaspossible
while still pointing toward the screen correctly, and then skip to step
C.
B. Ifanextensionpoleoraccessorymountisbeingutilized,threadthe
extension and any adapters together, and then thread the top of the
extensionintotheceilingplate/adapterbyhandastightaspossible.
Tighten any set screws for the accessories at this time (see the
manualfortheaccessoryortheStrongProjectorMountAccessory
Guide for set screw locations and complete instructions).
C. After the mount body (B) is aimed at the screen, use the 2.5mm
AllenWrench(T1)andM5x5setscrew(J)tosecurethemountbody
in place. Minor alignment changes can be made later using the
adjustment knobs.
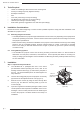
Inorderfortheprojectortohangevenlyfromthemountonceitisinstalled,thecenterofgravityoftheprojector
must be aligned to the center of the mounting base. Usually the center of gravity will not be in the center of the unit,
butslightlyclosertothesidethelensison.Iftheprojectorhasnomarkingtoindicatethislocation,followthese
stepstondthebalance.
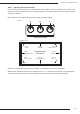
Set Screw Location (shown from two angles)
Step 3. Attach the Projector Mount Body and Optional Extension Accessories
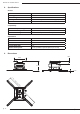
Step 4. Finding the Center of Balance of the Projector
(A)
(B)
Projection
Screen
Figure 5
Figure 6
Figure 7
(A)
(B)
(J)
(T1)
(T1)
(J)
Projection
Screen
Projection Screen
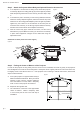
A. Pickuptheprojectoronoppositesidesandtryto
balance it between both hands. Move your hands
forward or back until the projector balances.
Once the balance is found, make a temporary
mark or note on the projector for reference.
B. Repeat for the opposite axis.
C. The intersection of the lines is the approximate
center of balance. Make a temporary mark
or note of this point for use in the next step of
installation.
Center of Balance
Projection Screen