
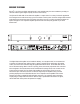
Owner manual


INSTALLATION – FIRST STEPS
POSITIONING YOUR EPISODE AMPLIFIER
Episode ampliers are designed to help deliver a great audio experience
that makes your music come alive for years to come. However, where you
place the amplier can have a large effect on the performance that you receive
and the life of the unit. If you are not rack-mounting the amplier, position it
with all feet resting on a solid level surface. Be sure that the amplier is in a
well-ventilated area that provides adequate cooling. If your installation lacks
good air ow, such as some solid door cabinets or wall-mounted racks, it may
be necessary to create some ventilation to air outside the cabinet or rack.
VENTILATION
Do not block ventilation holes, or impede air ow by placing objects on or
around the amplier. Do not place the amplier on carpeting or any similar
material. Do not install the amplier near a source of heat, or in an
extremely humid or wet location.
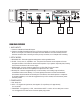
INSTALLATION – GETTING CONNECTED
CAUTION:
All connections and switching must be done with the
amplier’s power switch positioned to ‘Off’. Connect the power cord last
to be sure that the amplier is off during all of your connections and set up.
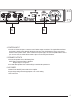
INPUTS
For line level connections, use high quality RCA cables that feature low impedance, shielding and high quality connectors.
SPEAKER OUTPUTS
Use 14-18 gauge stranded two-conductor loudspeaker wire for all high level connections. At each loudspeaker-level
connection, ensure that at least 2 inches of each conductor are separated. Strip away 1/4 inch of insulation from each
conductor. Connect the appropriate conductor to each screw terminal, observing correct polarity.
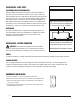
RACKMOUNT INSTALLATION
1. Remove the amplier’s four feet from the bottom of the chassis.
2. Attach the included rack-mount ears to the front sides of the amplier chassis.
3. Securely mount the amplier into the 19” equipment rack. The amplier will
occupy 1U of rack space.
4. Even though the amplier produces very little heat, it is always wise to leave
ventilation between components.
6
Make sure that there is a minimum of 5”
of free air space above the amplier and
3” on each side for proper ventilation.
Allow a minimum of 2” of depth behind unit
to accommodate cables and connectors.
Standard Placement of Amplier in Cabinet