
Manual


EA-AMP-12D-45A Installation Manual
Pg. 10
© 2013 Episode
®
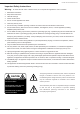
6. Installation and Setup
6.1. Positioning the Amplier
Episode ampliers are designed to help deliver a great audio experience that makes your music come alive
for years to come. However, where you place the amplier can have a large effect on the performance you
receive and the life of the unit.
• Be sure that the unit is in a well-ventilated area that provides adequate cooling.
• Do not block the cooling vents located on both sides of the unit.
• Do not place the unit on carpeting or any similar material.
• Do not install the unit near a source of heat, or in an extremely humid or wet location.
• If the installation lacks good air ow (such as solid cabinet doors or wall-mounted racks), it may be
necessary to create ventilation to allow outside air into the space.
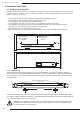
• Allow a minimum of 5” of free air space above the unit.
• Allow a minimum of 3” of free air space on either side of the unit. (Does not apply to rack mounting)
3in.3in.
5in.
Minimum of 3"
free air space on
each side.
Minimum of 5"
free air space
above.
2in.
6.1.1. Rack Mounting
The EA-AMP-12D-45A includes hardware to rack-mount the amplier. To prepare the amplier, attach the
rack ears at the front left and right sides as shown below using the included screws. Tighten the screws tightly
with a screwdriver. Then, remove the feet on the bottom of the unit and store the feet and screws in case they
are needed later.
To mount the amplier in the rack, 1-U of space is needed for placement, and 5 inches above the space should
be left open to allow for adequate ventilation. Install the amplier so that the rear of the unit can be accessed for
connections and adjustments for the output zone.
Important! The amplier chassis and rack ears are NOT designed to support anything other than
the amplier. DO NOT stack components on top of the amplier in a rack, as it could damage the
amplier’s chassis or block ventilation.
Remove Feet
Attach Ears using Supplied Screws
(4 on Each)