
Quick Start Guide


Instruction Manual
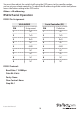
9
1. Power: Press this button to switch on the device or press it again to set it to standby
mode.
2. Info: Press this button to show the device’s rmware version.
3. Out A~D and In 1~4: Press out¬put A~D and then press input 1~4 to select display
input. For example: press Out A then press In 1, output A will display input 1’s image.
4. MATRIX/DUAL/WALL: Press to switch between Matrix mode, Dual mode and TV
Wall mode.
5. Lock: Press once to lock the keypad and remote control, press 3 second again to
re¬lease the lock function.
6. Mute: Press this button to mute the audio from HDMI output port.
7. / / / /OK: Press these buttons to scroll through the OSD selec¬tion and press OK
to enter and conrm the setting.
8. Exit: Press this button to exit the OSD menu or the OSD settings.
9. Menu: Press this button to enter into the OSD menu.
10. 1024x768/720p/1080p: Press these hot keys to switch between each
resolution.
11. AL/AR/BL/BR: When in Dual mode, press these hot keys to switch the audio
channel in Left or Right side for Dual A and Dual B group.
12. SAVE: To save the customized input and output corresponding settings.
i. Press “Matrix/Dual/Wall” button to select mode status.
ii. Press each output channel A~D and then press corresponding input
channel 1~4.
iii. Press “SAVE”, then input 1~4’s LED will illuminate at the same time, then
press remote control FAV.1~FAV.4 to save to the system memory.
13. FAV.1~FAV.4: Press favorite hot keys 1~4 to bring up the customized screen save
settings.
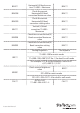
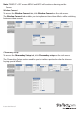
IR Remote Control Dip Switch
If you’re using multiple switches in the same location you can congure up to three
remote controls on dierent IR addressing to avoid interference with each other. To
adjust the remote control, open the Remote control back cover and adjust the dip-
switch ON/OFF to match IR address setting in the OSD menu. Factory default setting
is 0.
0
12
1
12
2
12
3
12