
User Manual


Instruction manual
3
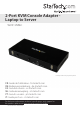
About the KVM console adapter
You must install the provided software on the laptop to be able to use the KVM console
adapter. You don’t need to make any changes to the server(s) being controlled, and the
adapter can be connected or disconnected at any time. You don’t need to start or shut
down the software before you unplug the adapter.
Install the software
Windows
Note: Complete the following steps before you connect the adapter.
1. Insert the provided USB software key into your laptop and run the setup.exe
installation program.
2. Follow the on-screen instructions to complete the installation.
3. Connect a USB 2.0 cable to the USB CONSOLE port on the front of the adapter and
to your laptop.
4. A Found New Hardware dialog window should appear.
5. Windows locates the device driver les and installs them automatically. This is a
one-time step that you won’t need to complete again.
6. Open the USB Crash Cart Adapter software and begin using the adapter.
Note: You don’t need to restart your computer to complete the installation.
Mac OS
1. Disconnect the adapter.
2. Insert the provided USB software key into your MacBook.
3. Double-click the MacOSX-install.dmg le.
4. After a short delay to verify the disk image, a window opens and displays the
application and a link to Applications. Drag and drop the main application onto the
Applications link.
5. To use the application, double-click Applications.
6. To add this application to the dock, drag and drop the main application from
Applications onto the dock.
7. Connect a USB 2.0 cable to the USB console port on the front of the adapter and
to your laptop.
8. Open the USB Crash Cart Adapter software and begin using the adapter.
Note: You don’t need to restart your computer to complete the installation.