
User Manual
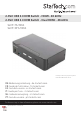
ManualsBrandsStartech ManualsComponents & AccessoriesStarTech.com 2 Port HDMI KVM Switch, Single Monitor 4K 60Hz Ultra HD HDR, Desktop HDMI 2.0 KVM Switch with 2 Port USB 3.0 Hub (5Gbps) & 4x USB 2.0 HID Ports, Audio, Hotkey Switching, TAA KVM with Fast Switching - KVM / audio switch - 2 ports - rack-mounta

Instruction Manual
4
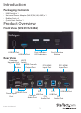
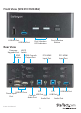
4. (Optional) Connect a 3.5 mm Audio Cable from the Audio Port on the Computer to
the corresponding PC 1 Audio Port on the rear of the KVM Switch.
5. Repeat Steps 1 to 4 for PC 2.
Operation
HDCP Switch
Note: If the HDCP version needs to be changed after the initial installation, a power cycle
of the KVM and connected devices may be required.
The HDCP Switch, located on the rear of the KVM Switch, is used to set the HDCP
version the KVM Switch will use with connected devices. The HDCP Switch can select
one of three dierent modes:
Auto – This mode makes the KVM Switch detect the highest compatible HDCP
version between Source and Display, and will then use that mode. This mode is
recommended for most setups.
1.4 - This mode forces HDCP 1.4 between the connected Source and Display
Devices, which may limit video performance. This mode should be used if you
experience issues getting video to pass through the KVM Switch, as it can help with
older device compatibility.
None – This mode disables the HDCP handshake between the connected devices
and the KVM Switch, which means protected content will not passthrough the KVM
Switch.
Power-On Sequence
1. Connect the Universal Power Adapter from a Wall Outlet to the Power Input Port
on the rear of the KVM Switch.
2. Power on all Peripherals.
3. Select PC 1 and power on the corresponding Computer.
Note: Ensure that the Computer connected to the PC 1 ports has fully booted to the
operating system before proceeding.
4. Repeat Step 3 for PC 2.