
Owners manual
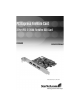

Instruction Manual
2
IInnssttaallllaattiioonn
Installing the PCI Express card
1. Make sure that your system is unplugged and that you are grounded.
2. Remove the cover of your system (see your computer's user manual for details, if
necessary) and gently turn your computer onto its side, so that the PCI Express
expansion slot openings on the motherboard are facing upwards.
3. Locate an empty PCI Express slot and remove the metal plate that covers the
corresponding rear bracket.You may need a Phillips screwdriver to perform this step.
Retain the screw! You will need it to secure the card later.
4. Gently insert the card into the empty slot, making sure it is firmly seated.
5. Secure the card in place using the screw you removed in Step 3.
6. Replace and secure the computer cover.
Once the PCI Express card has been installed, it is safe to power up the computer. The
operating system will detect the presence of the card and automatically install the
necessary software:
Driver installation
Windows 2000/XP
You will notice the following taskbar message balloons, indicating the status of the
installation:
To verify that installation was successful:
1. From the main desktop, right-click on My Computer and select Manage to open the
Computer Management window.
2. In the left pane, click on Device Manager.
3. In the right pane, click on IEEE 1394 Bus Host Controller, under which you should
notice AGERE OHCI Compliant IEEE 1394 Host Controller listed. This confirms
that the card was successfully installed, and is ready for use.