
User manual

2
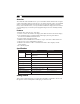
Unpacking the ST121UTP
This package should contain:
1 x Remote unit ST121UTP
1 x Local Unit ST121UTP
2 x 9V AC adapter
Installation
1. Make sure that the computer and monitors you are using for the installation are all
powered off.
2. Plug the male end of a male to female VGA extension cable into the computer’s video
output port; plug the female end of the cable into the Local unit’s PC port.
3. Plug the local monitor’s VGA cable into the Local unit’s Monitor port.
4. Plug one end of the power adapters into an AC source; plug the adapter’s power
cable into the Local unit’s AC 9V power jack.
5. Plug one end of the Category 5 twisted pair cable into the Local unit’s Remote I/O
port.
6. Slide the Range Switch to the Long position if the Remote unit is located a long
distance away; slide the switch to the Short position if the Remote unit is located a short
distance away.
8. Plug the remote monitor’s VGA cable into the Remote unit’s Monitor port.
9. Plug the second power adapter into an AC source; plug the adapter’s power cable
into the Remote unit’s AC 9V power jack.
10. Power on the computer and monitors.
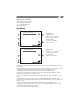
Monitor
Long
Short
To Remote Unit
AC 9V
Power
For PC
UTP VGA Video Extender
ST121UTP
Local Unit
Monitor
To Remote Unit
AC 9V
Power
UTP VGA Video Extender
ST121UTP
Remote Unit
5
6
4
1
2
3
4
1
2
3
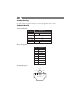
Local Unit
1. Range Switch
2. Remote I/O connector
3. AC 9V Power Jack
4. Power LED
5. Monitor connector
6. PC connector
Remote Unit
1. Remote I/O connector
2. AC 9V Power jack
3. Power LED
4. Monitor connector