Secure iPad Enclosure with Surface Mount SECTBLTPOS *actual product may vary from photos FR: Guide de l’utilisateur - fr.startech.com DE: Bedienungsanleitung - de.startech.com ES: Guía del usuario - es.startech.com NL: Gebruiksaanwijzing - nl.startech.com PT: Guia do usuário - pt.startech.com IT: Guida per l’uso - it.startech.com For the latest information, technical specifications, and support for this product, please visit www.startech.com/SECTBLTPOS.
Table of Contents Introduction.............................................................................................1 Packaging contents................................................................................................................................... 1 Product diagram.....................................................................................3 Front view..........................................................................................................................
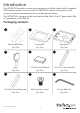
Introduction The SECTBLTPOS provides a secure way to mount your iPad to a table, wall, or standard VESA monitor mount. You can use the SECTBLTPOS to create a secure point-of-sale system, an interactive marketing kiosk, or an educational display. The SECTBLTPOS is designed to be used with the iPad, iPad 2, iPad (3rd generation), iPad (4th generation), or the iPad Air.
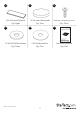
10 11 12 45x15x2 mm EVA pads 12.7x2 mm rubber pads Qty: Eight Qty: Four 13 14 5x20 mm self-tapping screws Qty: Three 15 15.4x5.0x2.0t flat washers 35x1.
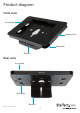
Product diagram Front view Front plate Security lock Rear plate Bracket Rear view Front plate Rear plate Instruction manual Bracket 3
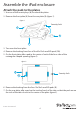
Assemble the iPad enclosure Attach the pads to the plates 1. Use one of the security keys (4) to unlock the plates. 2. Remove the front plate (2) from the rear plate (3) (figure 1). figure 1 Security lock 2 4 3 3. Turn over the front plate. 4. Remove the backing from four of the 45x15x2 mm EVA pads (10). 5. On the front plate, affix a pad in the center of each of the four sides of the rectangular-shaped opening (figure 2). figure 2 2 Security lock 10 6.
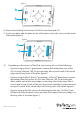
figure 3 3 5 8. Remove the backing from the two 25x100x15 mm foam pads (7). 9. On the rear plate, affix the pads in front of the tabs on the sides closest to the center of the plate (figure 4). figure 4 3 7 10. Depending on the version of iPad that you’re using, do one of the following: • If you’re using an iPad (1st generation), remove the backing from two of the 45x15x2 mm EVA pads (10). On the rear plate, affix a pad to each of the raised edges on the long sides of the plate (figure 5).
figure 5 10 figure 6 10 3 3 figure 7 6 3 Instruction manual 6
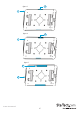
Insert an iPad To prevent scratching, you should handle the iPad with care when you insert it into the tablet holder. Note: Make sure that all of the necessary cables are plugged into the iPad before you insert it into the SECTBLTPOS. 1. Thread the iPad cables through the hole in the bottom of the rear plate (3). 2. Place the iPad in the rear plate so that it’s sitting on the two 25x100x15 mm foam pads (7) (figure 8). figure 8 iPad 3 7 3. Place the front plate (2) over the iPad (figure 9). figure 9 2 4.
Attach the iPad enclosure to a wall 1. Line up the holes on the mounting bracket with the four holes on the back of the rear plate (3). 2. Use the four M4x8 mm hex screws (8) and the 2.5 mm Allen key (9) to attach the mounting bracket to the rear plate. 3. Make three holes in the wall in the location where you want to attach the SECTBLTPOS.
Attach the iPad enclosure to a table or desk You have the option to attach the SECTBLTPOS to a table or desk in a fixed position or one that rotates. 1. Line up the holes on the mounting bracket (1) with the four holes on the back of the rear plate (3). 2. Use the four M4x8 mm hex screws (8) and the 2.5 mm Allen key (9) to attach the mounting bracket to the rear plate. 3.
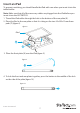
figure 12 1 12 13 14 figure 13 1 12 13 Set up the iPad enclosure on a table or desk Remove the backing from the four 12.7x2 mm rubber pads (11) and affix the pads to the bottom of the mounting bracket (1) (figure 14). figure 14 11 1 1. Line up the holes on the mounting bracket with the four holes on the back of the rear plate (3). 2. Use the four M4x8 mm hex screws (8) and the 2.5 mm Allen key (9) to attach the mounting bracket to the rear plate. 3.
Attach the iPad enclosure to a universal VESA mount 1. Line up the universal VESA mount with the four holes on the back of the rear plate (3). 2. Use the four M4x8 mm hex screws (8) and the 2.5 mm Allen key (9) to attach the VESA mount to the rear plate (figure 15). 3. Tighten as necessary.
Technical support StarTech.com’s lifetime technical support is an integral part of our commitment to provide industry-leading solutions. If you ever need help with your product, visit www.startech.com/support and access our comprehensive selection of online tools, documentation, and downloads. For the latest drivers/software, please visit www.startech.com/downloads Warranty information This product is backed by a two-year warranty. StarTech.
Hard-to-find made easy. At StarTech.com, that isn’t a slogan. It’s a promise. StarTech.com is your one-stop source for every connectivity part you need. From the latest technology to legacy products — and all the parts that bridge the old and new — we can help you find the parts that connect your solutions. We make it easy to locate the parts, and we quickly deliver them wherever they need to go. Just talk to one of our tech advisors or visit our website.