
Technical Specs


Instruction Manual
4
• Click New Partition Wizard and complete the instructions.
When the drive is successfully installed, it appears under My Computer or Computer
with a drive letter assigned to it.
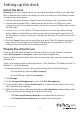
About driver installation
No driver or software installation is required for this product because the drive dock is
natively supported and the drivers are already installed.
Using the docking station
Remove the drive
Note: Make sure that the drive isn’t being accessed by the computer before you
proceed.
1. To remove the drive from your operating system, do one of the following:
• On computers running a version of Windows, on the Taskbar notication area,
click Safely Remove Device.
• On computers running a version of Mac OS, on your desktop, drag the drive to
the trash can icon.
For more information, see the documentation that came with your operating system.
2. Press the Power button on the top of the dock and wait for the dock to nish
powering down.
3. To release the drive, press the Drive eject button on the top of the docking station.
4. Pull the drive from the drive slot on the top of the docking station.
About the LED indicators
The LED indicator on SDOCKU313 is located underneath the Power button on the top
of the dock. For more information about what the LED indicators represent, consult the
table below.
LED behavior Meaning
LED indicator is solid blue The dock is turned on and receiving power.
LED indicator is red and
blinking regularly
A process (like read or write) is being completed.