
User Manual


Instruction Manual
8
Set the date and time on the eraser
1. Use the Menu navigation buttons on the front of the eraser to move up and down
in the Erase mode menu.
2. Select Utility and press the OK button.
3. Select Adjust Clock and press the OK button.
4. Use the Menu navigation buttons on the front of the eraser to select the current
date and time and press the OK button.
To return to the Erase mode menu, press the ESC button until you have exited the
Utility menu.
Change the order of the Erase mode menu
You can change the order of the items in the Erase mode menu so that the options that
you access the most often appear earlier in the menu.
1. Use the Menu navigation buttons on the front of the eraser to move up and down
in the Erase mode menu.
2. Select Utility and press the OK button.
3. Select Start-up Menu and press the OK button.
4. Set the function that is displayed rst when the eraser is turned on.
To return to the Erase mode menu, press the ESC button until you have exited the
Utility menu.
Print a receipt
You can use the SDOCK1EU3P with a serial printer to print an erase record with details
of the process, including the date and time that the drive was erased, the erase mode
used, and more. The receipt also includes an area for a signature.
Note: The RS232 serial-based printer port uses 9600 baud.
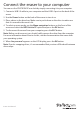
1. Use the RS232 serial-based printer port to connect a serial printer to the eraser.
2. Congure the connected serial printer to work on 9600 baud. Consult the
documentation that came with the serial printer for more information about how to
congure it.
When a process is complete, a receipt automatically prints on the connected serial
printer.