
Quick Start Guide

Quick start guide
DE: Bedienungsanleitung - de.startech.com
FR: Guide de l'utilisateur - fr.startech.com
ES: Guía del usuario - es.startech.com
IT: Guida per l'uso - it.startech.com
NL: Gebruiksaanwijzing - nl.startech.com
PT: Guia do usuário - pt.startech.com
Manual Revision: 06/29/2015
For the latest information, technical specications, and support for
this product, please visit www.startech.com/SDOCK1EU3P.
Packaging contents
• 1 x hard drive eraser and USB 3.0 dock
• 1 x USB 3.0 cable
• 1 x universal power adapter
• 4 x power adapter plug (NA/EU/UK/AU)
• 1 x quick start guide
SDOCK1EU3P
Standalone Hard Drive Eraser and USB 3.0 Dock
*actual product may vary from photos
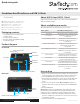
Product diagram
Front view
OK button
ESC button
Menu navigation buttonsLCD display
Error LED
Activity LED
Power and link LED
Eject button
Drive bay
Rear view
RS232 serial-based printer port
USB 3.0 port Power jack
Power
button
About USB 3.0 and USB 3.1 Gen 1
USB 3.0 is also known as USB 3.1 Gen 1. This connectivity standard
oers speeds up to 5 Gbps.
About available erase modes
SDOCK1EU3P features the following nine erase modes:
Erase option Description of the process
Quick Erase The partition table is quickly erased.
1-Pass Erase A full disk overwrite (all zeroes)
is completed.
3-Pass (DoD 5220.22-M) A multi-pass overwrite based on
DOD 5220.22-M specications
is performed.
3-Pass (CSEC ITSG-06) A multi-pass overwrite based on
CSEC ITSG-06 specications
is completed.
3-Pass (HMG Enhanced IS 5) A multi-pass overwrite based on
HMG Enhanced IS5 specications
is completed.
7-Pass (VSITR) A multi-pass overwrite based on
VSITR Specications is completed.
Custom Erase The user species the number of
passes and the pattern used.
Secure Erase The HDD/SSD ATA drive’s internal
Secure Erase command is executed.
Enhanced Secure Erase The HDD/SSD ATA drive’s internal
Enhanced Secure Erase command
is executed.
Erase a drive
1. Plug one end of the universal power adapter into the power jack
on the back of the eraser and the other end into a power source.
2. Use the Power button on the back of the eraser to turn it on.
3. Place the drive that you want to erase in the drive bay. Make sure
to push down on the drive to make sure that it’s secure in the
eraser.
4. To select an erase mode, use the Menu navigation buttons on
the front of the eraser to move up and down in the Erase mode
menu.
5. Press the OK button.
Warning! After you press the OK button, don’t remove the drive
from the eraser until it has nished erasing. Removing the drive
before the erase is complete may result in damage to the drive.
6. When the drive is erased, the LCD display will indicate that the
process is complete. If a serial printer is connected to the eraser, a
receipt will be printed.
7. To remove the drive, press the Eject button.