
Quick Start Guide

Instruction Manual
3
Hardware Setup
WARNING:
Hard drives and storage enclosures require careful handling, especially when being
transported. If you are not careful with your hard disk, lost data may result. Always
handle your hard drive and storage device with caution. Be sure that you are properly
grounded by wearing an anti-static strap when handling computer components or
discharge yourself of any static electricity build-up by touching a large grounded metal
surface (such as the computer case) for several seconds.
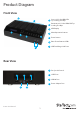
1. Using the included Power Adapter, connect the Power Adapter Port on the
SATDOCK5U3ER to an available AC power outlet.
2. Insert your SSDs/HDDs into the top loading drive bay(s). Ensure that the SATA
connectors on the SSDs/HDDs are facing the same corner of the drive bay that has
the 2.5in cut-out in the door. The label on the SSDs/HDDs should face the front of
the SATA docking station.
Notes:
• The drive containing the data to copy (Source HDD) needs to be inserted into
the Source bay.
• The drives designated to have data duplicated to them, or drives designated
for erasing must be placed in the Destination bays.
3. Press the power button to turn on the SATDOCK5U3ER, followed by the Drive
Power Buttons for each of the bays that contain an HDD/SSD. The Power LEDs
around the power buttons will light up, as the LCD display becomes active.
4. (Optional for Docking Station) Depending on your choice of interface connection,
connect the included eSATA or USB 3.0 cable from the respective port on the
SATDOCK5U3ER to an available port on your computer system.