
User Manual

Instruction manual
8
Erase a drive
Warning! After you erase a drive, any data that was stored on it will be unrecoverable
when the erase process is complete.
Note: Both drive slots on the SATDOCK2REU3 can be used to erase drives. If you have
drives in both slots when you complete the steps below, both drives will be erased.
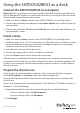
1. Disconnect the USB cable from the USB 3.0 port on the dock.
2. Insert the 2.5 in. or 3.5 in. drive or drive that you would like to erase into the HDD 1
Source slot on the dock.
3. If necessary, insert a second drive into the HDD 2 Destination slot on the dock.
4. Press and hold the Erase button for three seconds until the LEDs on the front of the
dock blink red. When all of the LED progress indicators on the front of the dock are
illuminated, including 100% complete, the erase process is nished.
If you want to check the drive and conrm that the data was erased, remove the drive
from the dock. Reconnect the dock to your computer, install the source drive in the
dock, and turn on the dock.
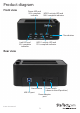
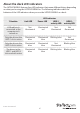
About the erase LED indicators
The SATDOCK2REU3 features four LED indicators. The following table describes the
behavior of the LED indicators when you use the SATDOCK2REU3 to erase drives.
LED indicators
Situation Link LED
25%
complete
Power LED
50%
complete
HDD 1
activity LED
75%
complete
HDD 2
activity LED
100%
complete
Erase in process Red (running back and forth)
As the process progresses, the completion indicators will be
solidly illuminated to indicate the state of completion.
Erase process
complete
Blinking red Blinking red Blinking red Blinking red
Erase process can’t
start
Not
illuminated
Not
illuminated
Not
illuminated
Blinking red
Erase process failed Not
illuminated
Not
illuminated
Not
illuminated
Illuminated
red
Erasing drives