
User Manual


Instruction manual
3
Install a drive
Warning! Hard drives and storage enclosures should be handled carefully, especially
when they’re transported. If you’re not careful with your hard drive, you may lose data
as a result. Make sure that you’re properly grounded by wearing an anti-static strap
when you install any computer component. If an anti-static strap isn’t available, touch
a large grounded metal surface for several seconds to discharge any built-up static
electricity.
1. Slide the drive tray out of the enclosure.
2. Connect the drive to the connectors on the drive tray.
3. To attach the drive to the drive tray, insert the four drive screws into the bottom of
the drive tray. Use a screwdriver to tighten the screws into place.
4. Slide the drive tray back into the enclosure.
5. To mount the drive tray to the enclosure, insert the two small screws into either side
of the enclosure. Use a screwdriver to tighten the screws into place.
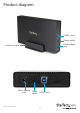
Connect a drive to your computer
1. After you install a drive in the enclosure, connect the power adapter to the
enclosure and an available AC outlet.
2. Connect the USB cable to the enclosure and the USB port on your computer.
3. On the enclosure, slide the Power switch to the ON position.
When you connect the enclosure to your computer and the OS automatically installs
the necessary software, the drive is accessible as though it’s installed internally in the
system. Before you use the drive, you need to prepare it for use and format it according
to the requirements of your OS. For more information, see the Prepare a drive for use
topic.
Prepare a drive for use
Windows OS
If you install a drive that already has data on it, after you insert the drive, it appears
under My Computer or Computer with a drive letter assigned to it.
If you install a brand-new drive that doesn’t contain any data, you must prepare the
drive for use.
Warning! When you complete the following steps, all of the data on your drive will be
deleted. If your drive has data on it that you require, you should create a backup le or
use a dierent drive.