
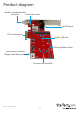
Technical Specs

Instruction manual
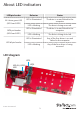
5
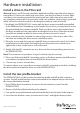
Install the PCIe card
Warning! PCIe cards can be severely damaged by static electricity. If an anti-static strap
isn’t available, discharge any built-up static electricity by touching a large grounded
metal surface for several seconds.
1. Turn o your computer and any devices or peripherals that are connected to it (for
example, printers, external storage, and so on).
2. Unplug the power cable from the back of your computer.
3. Disconnect any peripheral devices that are connected to your computer.
4. Remove the cover from your computer case. Consult the documentation that came
with your computer for details about how to do this safely.
5. Locate an open PCIe slot and remove the corresponding metal cover plate from
the back of your computer case. Consult the documentation that came with your
computer for details about how to do this safely. This card works in PCIe slots of x4,
x8, or x16 lanes.
6. Gently insert the card into the open PCIe slot and fasten the bracket to the back of
the case.
Note: If you install the card into a small form factor or a low-prole desktop system,
it may be necessary to replace the preinstalled standard-prole bracket with the
included low-prole (half-height) installation bracket.
7. As necessary, connect SATA cables from the SATA ports on the card to the SATA
drives inside of your computer.
8. Connect a 4-pin oppy power connector (small drive power) from the computer’s
power supply to the 4-pin power connector on the card.
9. Place the cover back onto your computer case.
10. Reconnect the power cable to the back of your computer.
11. Reconnect all of the peripheral devices that you disconnected in step 3.
12. Turn on your computer.
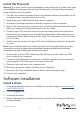
Software installation
Install a driver
1. To download the latest drivers, use a Web browser and navigate to www.startech.
com/PEXM2SAT3422.
2. Click the Support tab.
3. Download the driver.
4. When the download is complete, extract the contents of the compressed le that
you downloaded.