
User Manual


Installation
This section will guide you through the installation of your PCI card and the related
software. Please read through the instructions carefully and complete each step in the
order listed.
NOTE: Before you install the card, make sure that you have the appropriate software
drivers ready for download. If your OS is not listed on the driver diskette you may have
to download the drivers from our website first. See “Installing the Drivers” (pg. 4) for
more details.
Installing the Card
1. Make sure that your system is unplugged and you are grounded.
2. Remove the cover of your system (see your computer's user manual for details, if
necessary) and gently turn your computer onto its side.
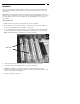
3. Locate an empty PCI slot (usually white in colour) and remove the metal plate that
covers the rear bracket. You may need a Phillips screwdriver to perform this step.
Hang on to the screw! You will need it to secure the card later.
4. Gently insert the card into the empty slot, making sure it is firmly seated.
5. Secure the card in place using the screw you removed in Step 3.
6. PCI2S550_LP ONLY: To install the second port on the PCI2S550_LP, join the
connector cable of the second port to the card, making sure that the red stripe on the
cable is connected to the labelled pin 1.
7. Put the computer cover back on.
3
PCI Slots