
Operation Manual

Instruction Manual
4
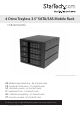
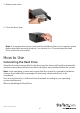
3. Hold the HSB4SATSASBA into place by lining up the screw holes on HSB4SATSASBA
with the corresponding mounting holes in your 5.25in bays. Next, x the
HSB4SATSASBA to your 5.25in bays by screwing 4 of the included screws into any of
the installation holes on both side of the 5.25” bay (8 screws in total).
4. Connect the 4x SATA cables (4x included) from an available SATA host port on your
motherboard to the SATA data connector ports on the back of the HSB4SATSASBA.
5. Connect 2x SATA Power connectors from your power supply to the SATA power
connector ports on the back of the HSB4SATSASBA.
Note: For optimal performance, ensure each SATA power connector is on a dierent
power rail. Failure to do so may result in power disruption while swapping drives.
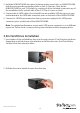
3.5in Hard Drive Installation
1. Insert either of the included bay keys into the your desired 3.5in Drive bay key holes
depending on which drawer you intend to install the drive into. And Turn the key
clockwise into the unlock position.
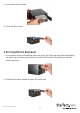
2. Pull the drive door handle to open the drive bay