
User Manual

Quick start guide
5
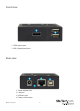
2. Connect the included power adapter to an AC power outlet and to the video adapter’s
power adapter port.
3. Connect the CAT5 cable (included) to the video adapter’s LAN port and to an Ethernet port
on your network, such as a router or NIC on your computer.
4. (Optional) You can connect up to two USB devices to the video adapter’s USB 2.0 peripheral
ports.
Note: In order for your computer to recognize the USB peripherals that you’ve connected,
the drivers for any connected USB device must be installed on your computer before you
connect the USB peripherals to the video adapter.
5. Hardware installation for Ethernet mode is now completed.
Basic conguration
Basic conguration for Windows computers
USB mode
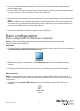
1. Click the DisplayLink icon that appears in your Windows system tray after you’ve completed
the Hardware Installation for USB mode steps.
2. When the DisplayLink menu opens, click Video Setup to launch the Windows display
settings.
3. Congure the monitor to your desired settings, including resolution and orientation.
Ethernet mode
Note: The steps below require that your network is congured for DHCP (automatic IP). If
DHCP is unavailable on your network, please download the full instruction manual for more
information.
1. Double-click the Launch USB Server icon on your desktop, to open the USB server
software.
Note: for advanced conguration please download the full instruction manual at:
www.StarTech.com/IPUSB2HD3