
User Manual


Instruction Manual
11
If the host computer’s BIOS supports USB boot devices, it is possible to boot from
the emulated CD-ROM or oppy - allowing complete operating system replacement
without any on-site intervention.
The rst step is getting a bootable disk image onto the emulated oppy or CD-ROM.
For CD-ROM images, you will need an .ISO image from a disk that contains special bits
to enable booting (“El Torito” standard). Nothing special is needed when reading the
ISO from a working, bootable CD-ROM.
Please note that each BIOS manufacturer oers varying levels of support for USB boot
devices and may require conguration methods that are unique (to the manufacturer)
in order to utilize this feature. Similarly, please note that many BIOS’s provide a
simplied USB host stack and oer drivers that may not oer suitable reliability.
To create a bootable oppy, you can format the emulated oppy from the target
system, or read the data from a working boot oppy. This can be done from Windows
using Disk Copy (right click on the drive letter in the Windows Explorer) or by using a
program like “RAWRITE”.
Once you have a bootable image (CD-ROM or oppy) working on the Enterprise Class
KVM unit, you must adjust your BIOS settings to tell it to boot from a USB device.
Please note: You must select USB CD-ROM as the boot device for the BIOS, if using a
CD-ROM image and USB Floppy if using a oppy image.
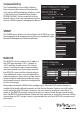
Network Conguration
DHCP: Automatic network conguration using DHCP is: Enabled/Disabled. This
feature applies only to the LAN port on the
rear panel, and is enabled by default. When
enabled, the unit will automatically congure
itself with an IP address when a DHCP server
is present. When disabled, the LAN port
will use the values assigned to it on the IP
Addresses and Routing table below.
IP Addresses and Routing: This table allows
you to assign IP information for the LAN and
WAN ports separately. If you are using DHCP,
the values for the LAN port will be lled in
automatically and any changes made will not
aect the setup.
Domain Name Server: This section allows
you to specify DNS servers and the default
DNS domain sux in use on the network. If
DHCP is enabled, some of these values may
be supplied automatically.